Monday, April 30, 2012

Design Team Project
By Kim Smith

You're One Of A Kind...Altered Notebook


I made this little altered notebook using one of my favorite images from the Seaside CD by Lisa Kettell Designs!  Here's a quick little tutorial on how to make your own....

You're One Of A Kind Altered Notebook

Seaside Images CD by Lisa Kettel Designs
4x6 Composition Book with soft cover
Glue Stick
Glitter Glue
Rhinestones
Tissue Tape
Chalk Inks
Rubber Stamp
Spray Finish
Rayon Ribbon
Asstd Buttons

1. Pick your fav image from the Seaside CD and print it out to match the size of your notebook. In my example, my notebook measures 4x6 inches.
2. Glue the image to your front cover and let glue dry completely. I used a gluestick for mine because it dries quickly.
3. Embellish your image with glitter glue and rhinestones. I typically use flatter embellishments for my little notebooks so they are easy to carry.
4. Use tissue tape (Tim Holtz is used in this example) around the edge of the notebook. It gives a nice clean finish if folded over the edge.
5. Accent edge with chalk inks in desired color.
6. Stamp your message on image. I used Inkadinkado stamp for this project.
7. When all is dry, spray your cover with a clear finish. I used Krylon Low Odor Clear Finish in Matte because I like the soft vintage feel but you could also use a gloss if you prefer.
8. Wrap dyed rayon ribbon around edge of cover, tie at bottom, add fun buttons or charms if desired.

A quick fun project! Please visit Lisa's blog Faerie Enchantment for info on where to buy her fabulous images to make your own altered notebook. xoxo
___________________________________________________________________________________
How fabulous is this project? I love love love this, Now I want to make one too!
xoxo
Lisa!

Saturday, April 28, 2012

Shabby and Chic Baseball Cuffs!
By: Lisa Kettell
Custom Shabby Baseball Cuffs! 9Here are the newest additions to the baseball family of cuffs. Three Shabby and Chic Baseball Cuffs which were made for some clients. The baseballs were made from used MLB baseballs, One was kept in its raw state, the other two were dyed a chic pink and a chic violet, lined in pearls, backed in leather and decorated w/rhinestones and a clasp.Custom Shabby Baseball Cuffs! 8Custom Shabby Baseball Cuffs! 10Custom Shabby Baseball Cuffs! 11Custom Shabby Baseball Cuffs! 12The dye process of the leather cuffs is a full day, sanding, dying, coating, drying, you never know what kind of color you will get due to the grain of the baseball, more grunge and distressed ones get darker tones and imperfections which add to the charm, newer ones get lighter colors and have a smoother blend.


The rhinestones on all cuffs are medium grade, we recently tried a new glue and decided to go back to the original one we were using, dries clear and has more durability. If customers want the Austrian Crystal high grade rhinestones or snap/studded, the price is more as these supplies are more expensive to buy for the cuffs.


Take care in wearing your rhinestone cuffs, even know the glue is high quality, you still risk the chance of loosing a stone if you are too rough. If one falls off, I recommend quick grip to re-position another rhinestone or embellishment. 
Custom Shabby Baseball Cuffs! 7Custom Shabby Baseball Cuffs! 6Custom Shabby Baseball Cuffs! 5Custom Shabby Baseball Cuffs! 4Custom Shabby Pink B-Cuff: Holly! 4Custom Shabby Pink B-Cuff: Holly! 3Custom Shabby Pink B-Cuff: Holly!Stay tuned for more shabby and chic baseball cuff styles/colors in seer-sucker, mint green, taffy aqua, bright pink and navy!


xoxo
Lisa!


Thursday, April 26, 2012

Design Team Project
By Marfi Bradford

Whimsical Paper Dolls!
When I was 8 I had a friend that had a huge collection of paper dolls, fortunately she was generous and didn't mind sharing. We'd play for hours, changing accessories and outfits.One of the best things was being able to keep all the outfits that were damaged...I'd bring them home and "repair" them, adding glitter, construction paper, photos from magazines and fake flowers.
This week's project for Lisa Kettel Designs helped me remember how much fun that was.
I used an image from a collage clip art CD which you can find in Lisa's shop.

Marie Antoinette Materials
Vintage Image
ribbon
pink ruffled ribbon
cage and bird stickers
red glitter heart sticker
resin rose stickers
glitter in dark pink, iridescent pink
paper flowers
small artificial rose
white pompom trim
rhinestones
decorative scrapbook paper
card stock
white craft glue
hot glue
glue stick

Directions

1.print image onto card stock
2.glue decorative paper onto card stock using a glue stick, press out air bubbles,
3.cut into skirt shape
4.attach image to top of skirt
5.hot glue ruffles to lower half of skirt, starting at the bottom.
6.add pompom trim using white glue
7.add paper flowers to dress
8.brush white glue to flowers and sprinkle with iridescent glitter
9.arrange rhinestones onto doll
10.attach artificial rose to skirt using hot glue
11.place cage on her head and bird sticker to her hand
12.add glitter heart sticker to hip
13.hot glue ribbon to back of doll to hang if you wish


Flower Fairy Materials
Vintage image
glitter paper
fabric roses
silver glitter tinsel
artificial leaf
crepe paper flower
pink pipe cleaner
ribbon
coarse glitter in pink and gold
plastic wings
card stock


Directions
1.print image onto card stock, cut out
2.draw arms onto remaining card stock, cut out and glue to torso
3.glue leaf to bodice
4.add fabric roses to top of arms to form sleeves
5.glue tinsel ribbon to 'waist'
6.hot glue torso and head to tissue paper flower
7.drizzle white glue to flower and cover with pink glitter
8.form legs out of pink pipe cleaner and glue to inside of skirt
9.add more fabric flowers for shoes
10.cut out crown shape out of gold glitter paper attach to top of head
11.glue wings to back of doll.
12.add ribbon to back of doll to hang


Tip:
use butterfly wings or stickers instead of plastic wings
tissue paper flowers can be found in the greeting card/birthday section of Target
use crepe paper instead of fabric ribbon

Visit Lisa Kettell Designs, her artfire shop or her beautiful blog for more inspiration !!
.....................................................................................................................................................................

How amazing are these paper dolls that Marfi did? I love them! xoxo

Wednesday, April 25, 2012

Pink Tape Measure Bracelets
By Lisa Kettell
Pink Tape Measure Bracelets! 13
I'm obsessed with vintage rulers, tape measures and metric sticks, they can have so many different functions outside of measuring objects or patterns. They can be broken down to make frames, cover a frame, frame stands, lamp shades, chandeliers, photocopied to decaupage furniture, canvas, scrapbooking, various paper projects, used in steampunk projects, cover a box, turned into ribbon, wands, and jewelry.


The project I created is another version of the hardware store, measure tape, only this one is seamstress/sewing measuring tape which is a fiberglass fabric material used in measuring patterns and details for sewing, where hardware store measuring tape is more metal/aluminum in texture. Seamstress Measuring tapes usually come in a variety of colors, I have seen violet, magenta, orange, yellow, green, blue and pink which I am using today.


This project has been thought up in many ways around the internet from various talented artists, this is my version of an up-cycled classic using snaps, buttons and broken jewels. What I like about using the seamstress measuring tape is that you can sew through it and its easier to work with then the hardward store version.Pink Tape Measure Bracelets! 4
Pink Tape Measure Bracelets! 3
Pink Tape Measure Bracelets!
Materials
-60” Tape Measure, pink/fiberglass By Singer
-Adhesive Buttons, antique green By Studio G
-5/8” Snap Attacher Tool 
-5/8” Snaps
-Scissors By Westcott
-Standard one hole puncher
-Quick Grip By Beacon Adhesive

-Other: Broken jewels, clip earrings, rhinestones, charms, ribbons, trims
Pink Tape Measure Bracelets! 12Pink Tape Measure Bracelets! 11
Directions
1. Measure your wrist, leaving an extra 1 1/2 inch room for applying the snaps. My wrist measured 7 inches, I cut an 8 1/2 inch piece from the tape measure.
2. Punch 1 hole at each end of the cut tape measure, leaving 1/2 inch room from the edge.
3. Attach snaps according to package directions (really simple).
4. Begin decorating your bracelets with buttons, rhinestones, clip earrings, embellishments of your choice. I glued everything w/quick grip for a sturdy hold.
Pink Tape Measure Bracelets! 10Pink Tape Measure Bracelets! 8Pink Tape Measure Bracelets! 8
Tips/Tricks
-When doing this project with children, use a sturdy tacky glue for more safety, Beacon Adhesives offers a fab glue: Kids Choice Glue, which I use in many projects as well.
-Cut a wide piece of cross stitch fabric and attach 3 strips of measuring tape side by side to it, attach in place with Fabri-Tac, apply snaps at each end for a larger style cuff.
-Add charms or handmade embellishments to the bracelets.
-Cut them into 2 inch pieces, add ribbon claws at each end and connect w/jewels/pearls for a necklace.
-Turn Long strips into purse straps.
-Cut off the handles of a craft store muslin tote, and add the measuring tape.
-Turn into a headband.
Pink Tape Measure Bracelets! 14
Pink Tape Measure Bracelets! 16Pink Tape Measure Bracelets! 17The possibilities are endless, I can't wait to see what you make! Hope this inspired you to recycled some measuring tape and make some fun recycled jewelry!
xoxo
Lisa!


Tuesday, April 24, 2012

The Frozen Peaks Experience!
By: Lisa Kettell
Frozen Peaks, Ledgewood, NJ! 6
Recently a Frozen Peeks Frozen Yogurt opened up near my house about 15 minutes away in Ledgewood, NJ. Curious to know what it was, Mom and I decided to take a visit there after the book store and we were so glad we did, its utopia for the Yogurt lover with 24 flavors and over 60 toppings making your frozen yogurt experience an extremely healthy guilt free one or just 1/2 the guilt. 
Frozen Peaks, Ledgewood, NJ! 4
Create concoctions like the Island Banana which is:
-6oz of Island Banana
-1/4 cup strawberries
-1/4 cup pineapples
-1/4 cup coconut

A cup of the Island Banana is the perfect non-fat, gluten free, probiotic way to a guilt free and delicious treat that is low in calories and high in protein. This concoction comes straight from their website:
http://frozenpeaks.com
Frozen Peaks, Ledgewood, NJ! 5
Here is the Nutrition Fact Sheet straight from their website:

Frozen yogurt from FrozenPeaks™ tastes good and is good for you. Frozen Peaks features YoCream® frozen yogurt. Unlike some frozen yogurts, YoCream frozen yogurt is made from live and active cultures. These are the good bacteria that turn milk into yogurt and give it that tang. Because YoCream uses a special group of bacteria* that are known as probiotic, our frozen yogurt also provides numerous health benefits. Certified with the National Yogurt Association Live and Active Cultures Seal of Approval, when you come to FrozenPeaks you are guaranteed to enjoy a nutritious, delicious snack, meal or treat that: 

-Promotes a Healthy Lifestyle
The live and active probiotic cultures in Frozen Peaks frozen yogurt promote a health immune and digestive system. 

-Helps Manage Lactose Intolerance
Frozen Peaks frozen yogurt has increased digestibility for people with lactose intolerance or lactose maladsorption. 

-Supports Healthy Bones
An 8 fl oz serving of FrozenPeaks frozen yogurt is an excellent source of calcium – adequate calcium as part of a healthful diet is good for bone density and may reduce the risk of osteoporosis. 

-Is Good for Your Tummy
Our digestive system contains a number of "good bacteria" that are necessary for optimal digestion. FrozenPeaks frozen yogurt helps maintain a healthly digestive tract.
 FrozenPeaks frozen yogurt is low cholesterol and low sodium, and are Kosher Certified.
 Frozen Peaks, Ledgewood, NJ! 7
As some one with a weakness for Ice Cream/Frozen Yogurt, but who is on a healthier eating regime, foods that can provide an added treat to my diet are always welcome, so if it is frozen yogurt that tastes amazing and allows me to enjoy every last bite without guilt then I am all for it. At Frozen Peaks I tried 1/2 Red Velvet and 1/2 Coconut w/some rainbow sprinkles and it was amazing, mom had 1/2 Cookies and Cream with 1/2 Red Velvet, which I will try next time I go.
 Frozen Peaks, Ledgewood, NJ! 2
The added feature to Frozen Peaks is that its self serve, you grab a container, then fill with the frozen yogurt flavor or flavors of choice, then add toppings or leave alone, and pay at counter, which you pay by the weight. I will tell you it is a bit pricey, I paid for what looked like a medium sized container about $6.50, but its totally worth it. If you are looking to stay inside with your yummy treat, you will sit among a Jetson's style decor with orange, green and silver color tones, you can surf the web on their WiFi and listen to music from an ITunes Music box, adding to its unique experience. Frozen Peaks, Ledgewood, NJ! 3Frozen Peaks, Ledgewood, NJ!
Would I go back for another experience? Absolutely! Is it a fun place to meet up with the girls at night? Sure thing! But remember if going on a light date or bringing the kids, make sure you bring enough money or a credit card, you are paying by the weight, other then that, head on over and enjoy the experience.


xoxo
Lisa!

P.S. I took all these photos from my I-Phone, so you can always blog on the go!

Monday, April 23, 2012

Wedding Jar Vignettes
By: Lisa Kettell
Wedding Jar Vignette! 11

Wedding: a. the act of marrying or the celebration of a marriage b. (as modifier) wedding day 2. the anniversary of a marriage (in such combinations as silver wedding or diamond wedding) 3. the combination or blending of two separate elements epithalamium - A poem written to celebrate a wedding. confetti - It is the plural of Italian confetto, "small sweet," as it was originally real or imitation bon-bons thrown during a carnival or after a wedding. morganatic - A survival of an ancient Germanic marriage custom, a gift on the morning after the wedding from husband to wife called morgangeba, "morning" and "give"; it now describes a marriage between people of different social status, especially a man of superior rank and woman of inferior rank. wedding party party - a group of people gathered together for pleasure; "she joined the party after dinner" best man - the principal groomsman at a wedding bride - a woman participant in her own marriage ceremony bridesmaid, maid of honor - an unmarried woman who attends the bride at a wedding flower girl - a young girl who carries flowers in a (wedding) procession groom, bridegroom - a man participant in his own marriage ceremony groomsman - a male attendant of the bridegroom at a wedding trainbearer - one who holds up the train of a gown or robe on a ceremonial occasionWedding Jar Vignette! 10Weddings are a special time in not just a couples lives, but their family and friends, everyone comes together to help in the celebration. If you are a bride or groom, a bridesmaid or groomsman, mother of, mother to be, friend or co-worker, someone is always looking for that one "UNIQUE" gift or favor that no one they know will think of, a special token or keepsake given at the Bridal Shower, Bachelorette Party, Rehearsal or Wedding itself.Wedding Jar Fairies!Wedding Jar Fairies!
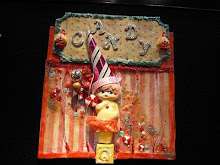
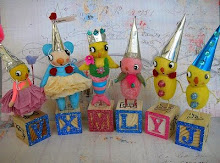
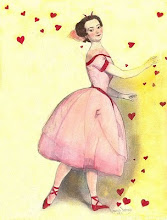
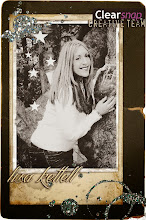
These two photos above are of the original wedding jar vignette I made for my the bride and fellow bridesmaids for the wedding I was in.

One concept I came up with were Special Occasion Memory Jars  which are also known by many who make these special tokens as: Jar Vignettes, Cloches, Time Capsules, Event Scenes, Jar Fairies, Assemblages, Jars of Life, Captured Portals, Tokens of Life. My concept differed from the iconic Captured Jar Fairy when I wanted to make the bride and fellow bridal party members a special token of my love, something special that they could cherish, so I created Wedding Jar Vignettes for the Bride and the rest of the girls in the Bridal Party over 5 years ago, I even made one for myself. After photographing these, I started getting requests for these vignettes from other friends and customers, which extended into baby showers, anniversaries and birthday parties. I created small sized jar favor vignettes, table markers and drop on your door invites, medium ones for special gifts and larger ones for table toppers and 3 to 5 foot ones for the garden, keeping within the customers specifications with colors, themes and even their own photographs.Wedding Jar Vignette! 9Wedding Jar Vignette! 5
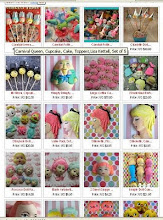
This set of Wedding Jar Vignettes is for Gemma in England, she is getting married May 5 and wanted customized jar vignettes to give to her sisters as a special gift, the result was an enchanted scene using vintage photographs merged together with photos of her sisters and herself, using shabby and chic whites, pinks, vintage silvers and pastel green excelsior for the base, pearl sticks, some hand dyed millinery, vintage silk ribbon, vintage piano paper and writing! These were so much fun to make and I'm filled with joy that they will be going to a group of wonderful girls.Wedding Jar Vignette! 8Wedding Jar Vignette! 7Wedding Jar Vignette! 6Wedding Jar Vignette! 4 When making these jar vignettes, make sure the images are good quality, double layered on sturdy backing for added support, jars are clear to see through to the front so the images and scene are visible. Add special tokens that suggest the memory at hand.Wedding Jar Vignette! 2Wedding Jar Vignette!Wedding Jar Vignette! 3The next set of images is of a Wedding Jar Fairy I did for Family CraftsGarden Wedding Glass Vignette! 3Garden Wedding Glass Vignette! 2Garden Wedding Glass Vignette!Here is the link to see the article/project: http://familycrafts.about.com/od/quartsizedjarcrafts/a/weddingjar.htm With the onset of Wedding Season I hope these jar vignettes have inspired you and get you ready for the wonderful wedding season!


Have an Enchanted Day!
xoxo
Lisa