Showing posts with label kim smith. Show all posts

Saturday, December 21, 2013

Cupie Stick Pins by DT Member Kim Smith


Today I am posting a project from returning DT member Kim Smith, who created this whimsical set of stick pins using Lisa Kettell Designs products. These can be used in almost anything. Add these stick pins to a project, scrapbook layout, assemblage or insert in cupcakes or just jazz up a party.

Here is Kim's Project:

Need a cute, quick, easy project to give as a gift, wear as a hat or lapel pin or accent your altered art? I made these Cupie Head Stick pins using items from LisaKettellDesigns...want to know how I did it? Here you go....

Materials:
  • Cupie Dollheads, LKD (Lisa Kettell Designs)
  • FrouFrou Stickpins, LKD (Lisa Kettell Designs)
  • Green Glitter Stars, LKD (Lisa Kettell Designs)
  • Glitter..I used white, pink and blue
  • Paper Flowers
  • Rhinestones

Directions:

  1. Take Frou Frou stick pin and gently slide it into  the Cupie Doll head. Check to be sure it's where you want before you continue.
  2. Put a thin line of white glue on head and sprinkle with glitter. Add rhinestone accent. 
  3. For Cupie Flower Stickpins, glue bottom of pin to star, add glitter and paper flower. 
  4. What next? Add more glitter! (be careful when working with the stickpin, you can add a pin keeper to the end to prevent getting poked and to finish the artpin.)


Cupie Dollhead Stickpins are shown on LKDesigns Bingo card, also available in the 
shop

Monday, November 18, 2013

Design Team Spotlight, Meet Kim Smith

Meet our new design team aka creative team for the 2013-2014 roster. Today I'd like to introduce you to Kim Smith


I'd like to welcome back the amazing Kim Smith back to the design team this year. Her work is outstanding. From mixed media painting to collage pieces, assemblages, atcs and her amazing grunge dolls, I can't pick out a favorite piece. Everything she does is MAGIC.


Her imagination, and edgy style brings a  magical vibe to the Lisa Kettell Designs Brand. We are so happy she is here once again.

I can't wait to see what Kim thinks up in the coming weeks. Here is a sneak peak of some of her amazing works!


A little bit about Kim:  

I'm a mixedmedia artist and collector of odd and broken things. I've been making art for as long as I can remember. I live on a small farm with my dogs, horses and a few chickens. My dream is to live on a large farm with an old haunted house (friendly ghosts a must)! - Kim

Visit Kim at: 
Stay tuned for our next design team member spotlight.
xoxo
Lisa

Friday, July 27, 2012

Design Team Project by Kim Smith

Bear and the Paper Crown
by Kim Smith

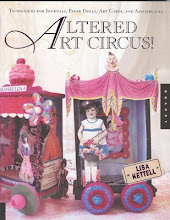
Kim's Bear is wearing his new crown inspired by a project book from my book: Altered Art Circus, Lisa Kettell, Quarry Books. The main image and the instructions to make this crown can be found in the book, along with other fun projects.
Altered Art Circus: Books!Altered Art Cirus! Front Cover
I love love love Design Team Member Kim Smith's version of the crown and her fabulous model aka "Bear", he is just the cutest model ever, I just want to kiss his nose.

Stay tuned this weekend for more design team projects and fun!

xoxo
Lisa

Monday, July 09, 2012

Design Team Project by Kim Smith

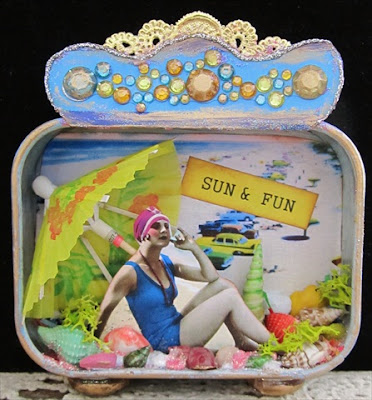
Sun & Fun....Seaside Assemblage

Lisa Kettell Designs Team

I made this fun little altered tin using images from Lisa Kettell Designs Seaside Collage CD. Here's a little tutorial on how to make one for yourself...

Supplies:
Seaside Collage CD- choose a background image and a figure that you like
3x4 inch rectangular tin without lid
Asstd shells
Tiny umbrella
Glitter, rhinestones, colored confetti
Small piece of gold German Scrap
Acrylic paints
Small items to make 'feet' for tin

1. Paint tin and let dry. I used blue and purple on the outside, creamy white on the inside.
2. Cut out your images. Glue your background to the inside of the tin and add words or any other embellishments you would like to use.
3. Add a small stand to the back of your figure and adhere to back of tin so she appears to be freestanding.
4. Add umbrella behind your figure and glue.
5. Glue confetti, moss, shells and glitter to the inside base of your tin.
6. Make your tin header from cardstock and decorate. I used rhinestones and a small piece of german scrap for mine. Glue to tin and edge with glitter.
7. Glue feet if desired to tin. I used clear pebbles with flat sides for mine.
8. Antique edges of tin, feet and other embellishments to age and add dimension.
9. Let it dry completely.


___________________________________________________________________________________
How amazing is this piece from design team member Kim? I just love it, after I spent a day at the Jersey Shore last Wednesday, then saw this piece, I became inspired to re-create my day at the beach following this fabulous seaside project!

Stay tuned for more amazing projects from our FABULOUS design team at Lisa Kettell Designs!
xoxo
Lisa

Monday, April 30, 2012

Design Team Project
By Kim Smith

You're One Of A Kind...Altered Notebook


I made this little altered notebook using one of my favorite images from the Seaside CD by Lisa Kettell Designs!  Here's a quick little tutorial on how to make your own....

You're One Of A Kind Altered Notebook

Seaside Images CD by Lisa Kettel Designs
4x6 Composition Book with soft cover
Glue Stick
Glitter Glue
Rhinestones
Tissue Tape
Chalk Inks
Rubber Stamp
Spray Finish
Rayon Ribbon
Asstd Buttons

1. Pick your fav image from the Seaside CD and print it out to match the size of your notebook. In my example, my notebook measures 4x6 inches.
2. Glue the image to your front cover and let glue dry completely. I used a gluestick for mine because it dries quickly.
3. Embellish your image with glitter glue and rhinestones. I typically use flatter embellishments for my little notebooks so they are easy to carry.
4. Use tissue tape (Tim Holtz is used in this example) around the edge of the notebook. It gives a nice clean finish if folded over the edge.
5. Accent edge with chalk inks in desired color.
6. Stamp your message on image. I used Inkadinkado stamp for this project.
7. When all is dry, spray your cover with a clear finish. I used Krylon Low Odor Clear Finish in Matte because I like the soft vintage feel but you could also use a gloss if you prefer.
8. Wrap dyed rayon ribbon around edge of cover, tie at bottom, add fun buttons or charms if desired.

A quick fun project! Please visit Lisa's blog Faerie Enchantment for info on where to buy her fabulous images to make your own altered notebook. xoxo
___________________________________________________________________________________
How fabulous is this project? I love love love this, Now I want to make one too!
xoxo
Lisa!

Tuesday, April 03, 2012

Design Team Member Project

By Kim Smith

Look What Bloomed in My Garden!


I made these little cuties using adorable little painted Doll Heads from MoonFairesWorld, Lisa Kettell's fabulous shop on ArtFire where you can find so many cute things for your altered art projects!

Materials:

-Cupie Head, Cotton Candy Color, Lisa Kettell Designs
-Carnival Cupie, Circus Tamer, Lisa Kettell Designs
-Party Chick, Lisa Kettell Designs
-Pre-made Felt Flower
-Basic Cupcake Topper
-Small Sized Flower Pot
-Paperclay or Floral Foam
-Colored Party Confetti or Glitter
-Umbrella Picks

Directions:

1. Glue cute little heads onto a pre-made felt flower (or make your own). Let dry and then glue the entire piece to a cupcake topper that you can find in the party section of your favorite craft store.

2. Put paperclay or foam inside the little flower pot to hold your elements. Layer over the clay or foam with colored confetti.

3. Poke a hole with the cupcake topper into the foam in the place you would like to have your little face. I put mine toward the front of the flower pot. Add Umbrella picks and other decorative picks, and you're done!

So quick and easy to make...and so very fun! If you love this little project, please visit MoonfairesWorld , I would love to see what you make!
xo
Kim

>>>>>>>>>>>>>>>>>>>>>>>>>>>>>>>>>>>>>>>>>>>>>>>>>>>>>>>>>>>>>>>>>>
To visit more of Kim's works and to see this original post visit her fabulous blog at:
http://www.tabithalenox.blogspot.com

To purchase our embellishments visit my Artfire Store!
xoxo
Lisa!