Showing posts with label kim smith project. Show all posts

Saturday, December 21, 2013

Cupie Stick Pins by DT Member Kim Smith


Today I am posting a project from returning DT member Kim Smith, who created this whimsical set of stick pins using Lisa Kettell Designs products. These can be used in almost anything. Add these stick pins to a project, scrapbook layout, assemblage or insert in cupcakes or just jazz up a party.

Here is Kim's Project:

Need a cute, quick, easy project to give as a gift, wear as a hat or lapel pin or accent your altered art? I made these Cupie Head Stick pins using items from LisaKettellDesigns...want to know how I did it? Here you go....

Materials:
  • Cupie Dollheads, LKD (Lisa Kettell Designs)
  • FrouFrou Stickpins, LKD (Lisa Kettell Designs)
  • Green Glitter Stars, LKD (Lisa Kettell Designs)
  • Glitter..I used white, pink and blue
  • Paper Flowers
  • Rhinestones

Directions:

  1. Take Frou Frou stick pin and gently slide it into  the Cupie Doll head. Check to be sure it's where you want before you continue.
  2. Put a thin line of white glue on head and sprinkle with glitter. Add rhinestone accent. 
  3. For Cupie Flower Stickpins, glue bottom of pin to star, add glitter and paper flower. 
  4. What next? Add more glitter! (be careful when working with the stickpin, you can add a pin keeper to the end to prevent getting poked and to finish the artpin.)


Cupie Dollhead Stickpins are shown on LKDesigns Bingo card, also available in the 
shop

Friday, July 27, 2012

Design Team Project by Kim Smith

Bear and the Paper Crown
by Kim Smith

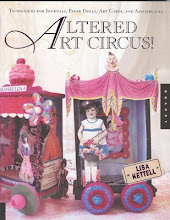
Kim's Bear is wearing his new crown inspired by a project book from my book: Altered Art Circus, Lisa Kettell, Quarry Books. The main image and the instructions to make this crown can be found in the book, along with other fun projects.
Altered Art Circus: Books!Altered Art Cirus! Front Cover
I love love love Design Team Member Kim Smith's version of the crown and her fabulous model aka "Bear", he is just the cutest model ever, I just want to kiss his nose.

Stay tuned this weekend for more design team projects and fun!

xoxo
Lisa

Thursday, July 12, 2012

Design Team Project by Kim Smith


Baby Bailey Treasure Box....with Tutorial!


This pretty little altered box was made using a simple wooden box and a Lisa Kettell Designs  'Baby Bailey' style molded doll. I love these little molded dolls!


Supplies:

Baby Bailey Molded Doll 3 inch
Small wooden hinged box with lid
Fabric flowers and leaves
Tacky Glue
Decoupage glaze
Acrylic Paint
Decorative napkins
Gold Rub n Buff
Distress Ink
Glitter


Directions:

1. Glue Baby Bailey to the top of your box using Tacky Glue and let dry. The box I used had a little inset in the top which was perfect for placing my little doll.
2. Paint the inside of your box with acrylic paints, let dry.
3. Collage a pretty paper napkin (separated from it's white base layer) onto the outside of the box (avoid covering the hardware) using matte medium and then paint to add more color if you wish.
4. Glue small fabric flowers around your Baby Bailey, add leaves and other small floral accents until you like how it looks.
5. Glue a word or other embellishment on to Baby Bailey's tummy if would like.
6. Apply a thin coat of decoupage glaze to Baby Bailey and the flowers, being sure to coat them evenly. Add more thin coats as needed until you are happy with how it looks.
7. When the last coat on the top is completely dry, add a thin coat to the rest of the box if you wish.
8. When all is dry, use distress ink to age and add dimension.
9. Use gold Rub n Buff on the edges of the box and on the hardware.
10. Add glitter if you wish and then let it all dry.

Please be sure to visit Lisa Kettell's Moonfaire'sWorld for lots of other fun art stuff for your mixed media projects! xo

___________________________________________________________________________________
I love love love Kim's newest project, this is amazing, I love what she did with the Bailey Style, I'm drooling over here, can't wait to try this! xoxo

Monday, July 09, 2012

Design Team Project by Kim Smith

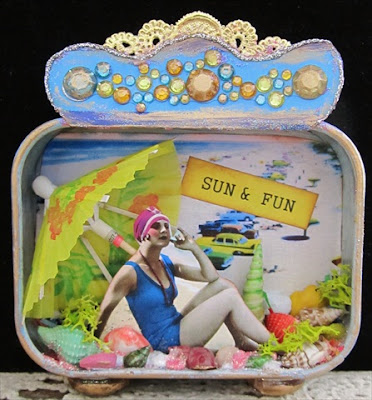
Sun & Fun....Seaside Assemblage

Lisa Kettell Designs Team

I made this fun little altered tin using images from Lisa Kettell Designs Seaside Collage CD. Here's a little tutorial on how to make one for yourself...

Supplies:
Seaside Collage CD- choose a background image and a figure that you like
3x4 inch rectangular tin without lid
Asstd shells
Tiny umbrella
Glitter, rhinestones, colored confetti
Small piece of gold German Scrap
Acrylic paints
Small items to make 'feet' for tin

1. Paint tin and let dry. I used blue and purple on the outside, creamy white on the inside.
2. Cut out your images. Glue your background to the inside of the tin and add words or any other embellishments you would like to use.
3. Add a small stand to the back of your figure and adhere to back of tin so she appears to be freestanding.
4. Add umbrella behind your figure and glue.
5. Glue confetti, moss, shells and glitter to the inside base of your tin.
6. Make your tin header from cardstock and decorate. I used rhinestones and a small piece of german scrap for mine. Glue to tin and edge with glitter.
7. Glue feet if desired to tin. I used clear pebbles with flat sides for mine.
8. Antique edges of tin, feet and other embellishments to age and add dimension.
9. Let it dry completely.


___________________________________________________________________________________
How amazing is this piece from design team member Kim? I just love it, after I spent a day at the Jersey Shore last Wednesday, then saw this piece, I became inspired to re-create my day at the beach following this fabulous seaside project!

Stay tuned for more amazing projects from our FABULOUS design team at Lisa Kettell Designs!
xoxo
Lisa

Monday, June 18, 2012

Design Team Project: Mermaid Mini Card

Design Team Project

by Kim Smith

Mermaid Mini Card....Faerie Enchantment Seaside Image! 

Here is a quick and enchanting project created by design team member Kim Smith using card stock, collage images from Lisa Kettell Designs Seaside CD and various other fun embellishments!


Kim made this little 1x3 inch mini card for the swap on JoAnne's VintageDragonfly Mermaid Mini Card swap on her Flickr group. So much fun making these small cards and seeing how much you can add to them!

For this swap Kim used an image from Lisa Kettell's Seaside Images CD and then embellished with glitter, tiny seashells, metallic fish stickers and pieces from a garland. In her words: "Love the images from this CD"
Imagine all the possibilities, these cards remind me of moo cards, you could make your own moo cards for your business using vintage images and embellishments, writing your company or artistic name w/info on the back of the card! This sized card is perfect for pendants and as small book marks, the list goes on. I hope Kim's project inspired you to create some cards of your own, let's see what you come up with!

xoxo
Lisa

Tuesday, April 03, 2012

Design Team Member Project

By Kim Smith

Look What Bloomed in My Garden!


I made these little cuties using adorable little painted Doll Heads from MoonFairesWorld, Lisa Kettell's fabulous shop on ArtFire where you can find so many cute things for your altered art projects!

Materials:

-Cupie Head, Cotton Candy Color, Lisa Kettell Designs
-Carnival Cupie, Circus Tamer, Lisa Kettell Designs
-Party Chick, Lisa Kettell Designs
-Pre-made Felt Flower
-Basic Cupcake Topper
-Small Sized Flower Pot
-Paperclay or Floral Foam
-Colored Party Confetti or Glitter
-Umbrella Picks

Directions:

1. Glue cute little heads onto a pre-made felt flower (or make your own). Let dry and then glue the entire piece to a cupcake topper that you can find in the party section of your favorite craft store.

2. Put paperclay or foam inside the little flower pot to hold your elements. Layer over the clay or foam with colored confetti.

3. Poke a hole with the cupcake topper into the foam in the place you would like to have your little face. I put mine toward the front of the flower pot. Add Umbrella picks and other decorative picks, and you're done!

So quick and easy to make...and so very fun! If you love this little project, please visit MoonfairesWorld , I would love to see what you make!
xo
Kim

>>>>>>>>>>>>>>>>>>>>>>>>>>>>>>>>>>>>>>>>>>>>>>>>>>>>>>>>>>>>>>>>>>
To visit more of Kim's works and to see this original post visit her fabulous blog at:
http://www.tabithalenox.blogspot.com

To purchase our embellishments visit my Artfire Store!
xoxo
Lisa!