By Amy Mayfield
I have been a bit obsessed with Halloween as of late. As of today, there’s barely six months to prepare! Where has the year gone?
I had another project all planned out in my head for Lisa Kettell Designs when I was rooting through my craft supplies and came across these wonderful witches; the Kewpie Magic Witches from Lisa Kettell Designs. These come in handy because capturing a witch of your very own is tricky, witchy business and even these little ones are full of tricks and treats.
Supplies Needed:
Kewpie Magic Witches
Mini glass cloche (I took apart some ornaments I got on Christmas clearance that I bought just for the cloches. You could also use a small jar.)
Printed scrapbook paper
Thin cardboard
Stickles in silver, black and tarnished brass
A letter from scrapbook paper or cardstock
Moss
Hot glue gun
Tiny silver stars
Black pompom fringe
Some sort of little adornment, I used a brass moon
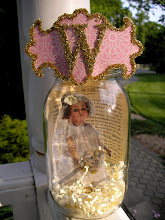
I jazzed my witch up using the silver Stickles because witches love sparkles. Honest. I also popped a tiny star on the tip of her pointed hat and made her a “top” with black Stickles. While she dried, I used a paper punch to cut out two circles with pinked edges to use as a base. I cut out a circle from the thin cardboard and glued them together to make a base. I covered the top and bottom of the cardboard with the printed paper–which is important if you plan to use her as an ornament. Then I made a ring of moss around the base, using the bottom of my cloche as a guide since I wanted the majority of it under glass. When the witch was dry, I made a big dollop of hot glue and dipped her feet in it, pressing lightly until she was “set.” Then I glued some tiny stars around the moss because, in my opinion, you can never have too many sparkles.
Once everything was dry, I ran a line of hot glue around the bottom of my glass cloche and, carefully but quickly, moved it in to place. Using the glue gun and my small black pompom trim, I made a border around the base of the cloche. I glued my W, for witch of course, to the top of the cloche using its ring as the base. If you are making an ornament, I would run my ribbon or whatnot through the ring before attaching the letter. Then I simply glued the moon to the letter and with a dab of glue, to the glass.
Now my tiny witch is spellbound and ready for happy hauntings and magical mischief!
___________________________________________________________________________________
I love love love this project that Amy Made, how amazing is it? Love, now I'm ready for Halloween or some Harry Potter Magic!
Here's the link to buy some of the Kewpie Follies pieces so you can make this project too!
http://www.artfire.com/ext/shop/product_view/MoonfairesWorld/4405535/Kewpie_Magic_The_Follies_Value_Pack_20_Lisa_Kettell/Dolls_Miniatures/Miniature/Other
or this link:
http://www.artfire.com/ext/shop/product_view/moonfairesworld/2596104/kewpie_magic__kewpie_witches_set_of_5__lisa_kettell/supplies/handmade_supplies/doll_making
Magic and Joy,
Lisa



















1 comment:
this is adorable!!!
i love the thought of capturing a tiny witch:)
this looks like a fun project!
Post a Comment