Friday, July 27, 2012

Design Team Project by Kim Smith

Bear and the Paper Crown
by Kim Smith

Kim's Bear is wearing his new crown inspired by a project book from my book: Altered Art Circus, Lisa Kettell, Quarry Books. The main image and the instructions to make this crown can be found in the book, along with other fun projects.
Altered Art Circus: Books!Altered Art Cirus! Front Cover
I love love love Design Team Member Kim Smith's version of the crown and her fabulous model aka "Bear", he is just the cutest model ever, I just want to kiss his nose.

Stay tuned this weekend for more design team projects and fun!

xoxo
Lisa

Wednesday, July 18, 2012

DIY Faux Vintage Tinsel

DIY Faux Vintage Tinsel!

Materials
-Non-detergent brillo pad ( cheap dollar store ones work)
-Clear tacky glue or clear glue
-Antique silver color glitter

Directions
1. Pull apart pieces of the brillo pad, begin rolling into a snake like shape.
DIY Vintage Tinsel! Part 1DIY Vintage Tinsel! Part 2DIY Vintage Tinsel! Part 3
2. To add more length to the rolled snake like shape, pull more brillo apart and attach to an end of the snake like shape, roll into. The brillo will attach easily to more brillo without the need for glue.
DIY Vintage Tinsel! 4DIY Vintage Tinsel! 5
3. Repeat step two until you use up the whole brillo pad.
DIY Vintage Tinsel! 6DIY Vintage Tinsel! 8
4. Add extra glitz using clear glue and antique silver glitter.

To age your faux vintage tinsel rub tinsel with a brown ink pad, I use mixed media ink pads from clearsnap to age my tinsel. DIY Vintage Tinsel! 2DIY Vintage Tinsel! 3
DIY Vintage Tinsel! 6
Tips/Tricks
-Try soaking your brillo pad in an ink bath, let dry. Use a heat gun to speed up the drying process.
-Wrap your tinsel around a vintage spool to store it.

Thursday, July 12, 2012

Design Team Project by Kim Smith


Baby Bailey Treasure Box....with Tutorial!


This pretty little altered box was made using a simple wooden box and a Lisa Kettell Designs  'Baby Bailey' style molded doll. I love these little molded dolls!


Supplies:

Baby Bailey Molded Doll 3 inch
Small wooden hinged box with lid
Fabric flowers and leaves
Tacky Glue
Decoupage glaze
Acrylic Paint
Decorative napkins
Gold Rub n Buff
Distress Ink
Glitter


Directions:

1. Glue Baby Bailey to the top of your box using Tacky Glue and let dry. The box I used had a little inset in the top which was perfect for placing my little doll.
2. Paint the inside of your box with acrylic paints, let dry.
3. Collage a pretty paper napkin (separated from it's white base layer) onto the outside of the box (avoid covering the hardware) using matte medium and then paint to add more color if you wish.
4. Glue small fabric flowers around your Baby Bailey, add leaves and other small floral accents until you like how it looks.
5. Glue a word or other embellishment on to Baby Bailey's tummy if would like.
6. Apply a thin coat of decoupage glaze to Baby Bailey and the flowers, being sure to coat them evenly. Add more thin coats as needed until you are happy with how it looks.
7. When the last coat on the top is completely dry, add a thin coat to the rest of the box if you wish.
8. When all is dry, use distress ink to age and add dimension.
9. Use gold Rub n Buff on the edges of the box and on the hardware.
10. Add glitter if you wish and then let it all dry.

Please be sure to visit Lisa Kettell's Moonfaire'sWorld for lots of other fun art stuff for your mixed media projects! xo

___________________________________________________________________________________
I love love love Kim's newest project, this is amazing, I love what she did with the Bailey Style, I'm drooling over here, can't wait to try this! xoxo

Monday, July 09, 2012

Design Team Project by Kim Smith

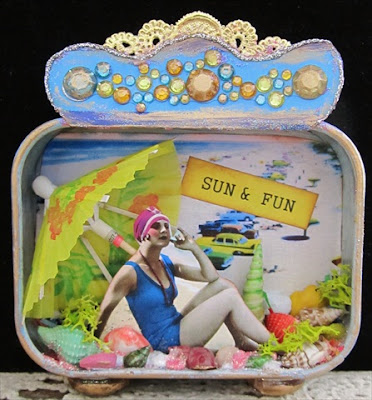
Sun & Fun....Seaside Assemblage

Lisa Kettell Designs Team

I made this fun little altered tin using images from Lisa Kettell Designs Seaside Collage CD. Here's a little tutorial on how to make one for yourself...

Supplies:
Seaside Collage CD- choose a background image and a figure that you like
3x4 inch rectangular tin without lid
Asstd shells
Tiny umbrella
Glitter, rhinestones, colored confetti
Small piece of gold German Scrap
Acrylic paints
Small items to make 'feet' for tin

1. Paint tin and let dry. I used blue and purple on the outside, creamy white on the inside.
2. Cut out your images. Glue your background to the inside of the tin and add words or any other embellishments you would like to use.
3. Add a small stand to the back of your figure and adhere to back of tin so she appears to be freestanding.
4. Add umbrella behind your figure and glue.
5. Glue confetti, moss, shells and glitter to the inside base of your tin.
6. Make your tin header from cardstock and decorate. I used rhinestones and a small piece of german scrap for mine. Glue to tin and edge with glitter.
7. Glue feet if desired to tin. I used clear pebbles with flat sides for mine.
8. Antique edges of tin, feet and other embellishments to age and add dimension.
9. Let it dry completely.


___________________________________________________________________________________
How amazing is this piece from design team member Kim? I just love it, after I spent a day at the Jersey Shore last Wednesday, then saw this piece, I became inspired to re-create my day at the beach following this fabulous seaside project!

Stay tuned for more amazing projects from our FABULOUS design team at Lisa Kettell Designs!
xoxo
Lisa

Tuesday, July 03, 2012

Design Team Project By Marfi Bradford

The following is a DT project for Lisa Kettell Designs created by DT Member, Marfi Bradford ! It is a piece straight out of a fairytale, she created this from inspiration in the book: Altered Art Circus, Lisa Kettell, Quarry Books. My book is available at major book stores, craft stores, independents and Amazon! Or purchase through me, autographed! Let's go an explore the amazing Marfi's Fabulous creation called: Rosalina and Poe!

Rosalina and Poe


Every time I look through Lisa Kettell's book Altered Art Circus, I'm so inspired!
For my latest design team project I decided on making my own version of "Miabelle and Gertie", one of the creations from this incredible book.

Supplies
Birdcage
small crown
pink wool roving
small Styrofoam bird
small wooden disk about 2 inches in diameter
model magic in white
acrylic paint in peach, pink, dark pink, rust, dark brown, black
black spray paint
rhinestones
pink tulle
scrapbook paper
paper flowers
assorted charms
assorted ribbon
pipe cleaner
doll hands
black glitter
hot glue

Directions
Spray paint birdcage, set aside to dry.
form doll head and torso out of model magic, poke pipe cleaner through to form arms, let dry overnight.
once dry, paint peach and add features using acrylic paint.wrap ribbon around torso to make bodice of dress.wrap more ribbon around pipe cleaners for sleeves.attach doll hands with hot glue.
hot glue wool to head and carefully mold into desired shape.
add rhinestones and crown.
hot glue bird to disc, paint black, cover with glitter, let dry.attach small birdcage charm to head of bird then glue bird to inside of cage.
attach assorted charms to cage.
glue doll to top of cage.
add paper flowers to doll and cage.place strips of accordioned scrapbook paper on sides of cage.
secure ribbon to base of cage.
tie pieces of tulle to back of cage.
make a bow with ribbon glue onto waist of doll.

Tips:doll parts can be found in the baking section of craft stores
you can add butterfly wings to back of doll.
children's jewelry can be used in place of crown
Buy Lisa's book 'Altered Art Circus' in her art fire shop


Saturday, June 23, 2012

Design Team Project

By Amy Mayfield 

A fanciful fairy shrine

Summer is going by oh so fast that I can’t even believe it but I DID finally find some time to play with the Lisa Kettell Fairy Follies CD. This CD has more than 600 gorgeous images that you can print and play with to your heart’s content. I also used another marvelous man in the moon because I just love all their little faces!
So here’s my Fairy Whispers Shrine–if you listen closely, you might just hear their little laughter and whispered secrets.
Supplies Needed:
A Lisa Kettell Image CD
Moons
Gold tinsel
Xacto knife
Super fine gold and silver glitter
Paper Mache bird house
White glue
Rubber Cement
Clothespins
Teeny tiny wooden spools
Gold metallic paint
Hot glue gun
Star brads
I used bits of five different images and a paper mache bird house I picked up for 99 cents at Hobby Lobby. With an xacto knife, I cut out the front of the bird house to make a large, rounded opening. For the lady that lives in the little shrine surrounded by a sea of stars, I used some star brads to add a little dimension and placed a beaming moon, painted gold, to gaze down upon her. I finished off the interior with some glitter paper and a polka dot “sky.” To jazz up her crown, I added six-sided star brads in two sizes. For attaching paper so that it dries nicely and non-wrinkly, I’ve been using rubber cement with clothespins to hold them in place–a trick I picked up from Knickertwists over at Pixie Hill. It’s pretty much my new favorite thing.

I love tinsel so I trimmed the front of the shrine with several layers of gold tinsel applied using hot glue gun. I also covered the roof using white glue and super fine gold glitter. On the back, I used a clear stamp and some gold metallic embossing powder to overlay the Fairy Whispers onto this pretty picture. Because you can NEVER have too much sparkle, I added more tinsel to trim the edges and used teeny wooden spools, painted with gold metallic paint, as feet.

To finish it off, I printed a butterfly fairy that I sized down, cut out and coated the bottom with super fine silver glitter. I slightly scored the wings to fold them up and attached it with a line of hot glue down the “body.”

There you have it! Lisa Kettell Designs is having a FABULOUS June Sale in the Artfire Store so hop on over and don’t miss out on savings and super supplies! (I also can’t say enough about her book, Altered Art Circus. I picked it up long before I joined the Design Team and it has such wonderful inspiration and how-tos PLUS if you buy it on Artfire, you can get it autographed!)

___________________________________________________________________________________
How amazing is Amy's project? I absolutely love it! There are so many possibilities with this project! Here is a similar one I made a few years ago:
Pretty The Bird!2Pretty The Bird!Pretty The Bird!3You can create enchanted ornaments, mini vignettes, circus or memory fun with this project. I hope Amy and Lisa Kettell Designs inspires you to create a shrine of your own!
xoxo
Lisa

Wednesday, June 20, 2012

Blue Moon Cupie Plant Stake

Design Team Project
by: Sherry Payne-Scott

Blue Moon Cupie Plant Stake


Materials:
 
    Cupie scrap book paper
    White Card stock   
    Modge Podge or White Glue
    Foam core 
    Bamboo Skewer
    Ruby Red and Silvery Blue Glitter
Directions:

1.Using the Cupie scrapbook paper from Lisa Kettell Designs, glue the Cupie to card stock using Modge Podge to give rigidity
Trim the Cupie out once it's dry

2.Using a paint brush with Modge Podge or white glue to put glue on the heart and the lips sprinkling ruby glitter on the heart and lips

3.Cut a 5 1/2" circle out of foam core spread Modge Podge on top and sides, sprinkle blue glitter all over the circle
repeat for back side and let dry

4.Glue back of Cupie liberally about to waist of Cupie place onto moon and put heavy book on it until it is set

5.Using a bamboo skewer stick gently stick in the side of the circle behind the Cupie's legs

This is great for a party or just a cute decoration in a plant!
 
Sherry 
________________________________________________________________________
How great is Sherry's project, so amazing, I could see all my plants with these or the whole garden.

Tips:
-Use outdoor glaze or decaupage medium and apply a few coats to your plant stake, insert in garden.
-Laminate your plant stake image for a weath proof all condition garden stake.

xoxo
Lisa

Monday, June 18, 2012

Design Team Project: Mermaid Mini Card

Design Team Project

by Kim Smith

Mermaid Mini Card....Faerie Enchantment Seaside Image! 

Here is a quick and enchanting project created by design team member Kim Smith using card stock, collage images from Lisa Kettell Designs Seaside CD and various other fun embellishments!


Kim made this little 1x3 inch mini card for the swap on JoAnne's VintageDragonfly Mermaid Mini Card swap on her Flickr group. So much fun making these small cards and seeing how much you can add to them!

For this swap Kim used an image from Lisa Kettell's Seaside Images CD and then embellished with glitter, tiny seashells, metallic fish stickers and pieces from a garland. In her words: "Love the images from this CD"
Imagine all the possibilities, these cards remind me of moo cards, you could make your own moo cards for your business using vintage images and embellishments, writing your company or artistic name w/info on the back of the card! This sized card is perfect for pendants and as small book marks, the list goes on. I hope Kim's project inspired you to create some cards of your own, let's see what you come up with!

xoxo
Lisa

Friday, June 15, 2012

Welcome to the Clearsnap and Trinity Paper Arts Blog Hop!!
IMG_4903
 Our Design Teams have "teamed up" to share layouts, projects, and more featuring Trinity Pap[er Arts' paper collections and Clearsnap's distinctive inks and accessories. From sports to summer and everything in between, kick your sandals off, grab a cold lemonade and enjoy the inspiration.   Hop along to each blog listed below and leave a comment.

http://clearsnap.blogspot.com/">http://clearsnap.blogspot.com/
http://trinitypaper.blogspot.com/">http://trinitypaper.blogspot.com/
http://tamisanders.com/">http://tamisanders.com/
http://taylordconcepts.blogspot.com/">http://taylordconcepts.blogspot.com/
http://thoughtsoftraveling.blogspot.com/">http://thoughtsoftraveling.blogspot.com/
http://stitchcutcreate.blogspot.com/">http://stitchcutcreate.blogspot.com/
http://www.arteypoemas.com/">http://www.arteypoemas.com/
http://www.kitsnbits.blogspot.com/">http://www.kitsnbits.blogspot.com/
http://inmyblueroom.blogspot.com/">http://inmyblueroom.blogspot.com/
http://www.rukristin.blogspot.com/">http://www.rukristin.blogspot.com/
http://sabrinaalery.blogspot.com/">http://sabrinaalery.blogspot.com/
http://www.jaxbeanstalks.blogspot.com/">http://www.jaxbeanstalks.blogspot.com/
http://www.hydrangeahippo.com/">http://www.hydrangeahippo.com/
http://scrapbookingischeaperthantherapy.blogspot.com/">http://scrapbookingischeaperthantherapy.blogspot.com/
http://whatsinalousyananut.blogspot.com/">http://whatsinalousyananut.blogspot.com/
http://blueyecicle.blogspot.com/">http://blueyecicle.blogspot.com/
http://www.twotearsinmybucket.blogspot.com/">http://www.twotearsinmybucket.blogspot.com/
http://faerieenchantment.blogspot.com/">http://faerieenchantment.blogspot.com/

Each comment is an entry into a drawing to win the entire Trinity Paper Arts' "Surf N Swim" Collection!


PLUS, a second winner will receive Smooch Spritz in Gingersnap, Designer Foils in Blue, and Design Adhesives!

For extra entries, post about this blog hop to Facebook, Twitter or your blog! Just leave a comment on either company blog telling us what you did and each comment will count as your extra entry. And now, let's heat up the summer!!


Distressed Circus Boards: Ollie's Storybook Circus
IMG_4906
Distressed Circus Boards were something I created for the Clearsnaps Design Team, a project designed with products found within the Clearsnap Product Line and some snippets of fabulous papers from Trinity Paper Arts, plus its apart of the Clearsnaps and Trinity Papers Blog Hop!

This project was inspired by elements of the circus, vintage game boards and my book, Altered Art Circus which is filled with circus and storybook themed projects, stories and recycled pieces. Since I love to recycle as much as I can, I used sturdy cardboard from a shipping box as my base, measured to 12 by 12 inches, then layered with vintage images, papers from Trinity Paper Arts, vintage circus supplies, embellishments from my embellishments line and distressed with fabulous inks and mixed media inks from clearsnap, along with my new all time fave product, Magic Stamp Moldable Foam, which allows you to make re-useable molds or impressions, with just a heat gun and a moldable piece.

Instead of a circus board try a memory board, a candyland board, wedding board, inspirational board, baby board, girl scout, steampunk or fairy board, so many possibilities to try.  IMG_4926
IMG_4912
 Materials

-Scrapbook paper, Trinity Paper Arts
-Vintage Images, circus follies collage cd, Lisa Kettell Designs
-Cardboard, chipboard or wood, cut to 12 by 12 inches
-Piccolo's, Globecraft Memories
-Air dry clay, Makins
-Various clay parts:XL cherry cupie head, bailey heads, lil chick, lil kewpie Lisa Kettell Designs
-Tools: scissors, paint brush, hot glue gun
-Glues: hot glue sticks, decaupage medium
-Other: ribbons, chipboard lettering, circus tickets, hardware, ephemera, mini light bulbs,       
 paper umbrella, clown cupcake topper, bakery twine, mini circus animals, coin wrappers,  chipboard, paper towel, etc.
IMG_4927
 Directions

 1. Print a variety or circus images, posters and ephemera from the collage cd, in a variety of small sizes, no bigger then 4 1/2 inches by 4 1/2 inches. Once you pick a good amount of circus images, arrange to taste onto a 12 inch by 12 inch piece of cardboard, glue in place with decaupage medium.

2. Spray smooch spritz in tea party red onto a paper towel and swipe over some of the images and embellishments. I added color to the paper umbrella by lightly spraying smooch spritz in tea party red over it, then let dry.

3.  With a edge swipe technique, swipe the edges of your collage circus board with a school house mixed media paint, rub into the board using paper towel, add more dimension using archival ink in pinkolicious and mudslide, let dry.

4. Age your collage images using honey color mixed media ink and a paper towel, rubbing into a circular motion. 

5. Cut out some favorite circus images, glue to chipboard w/decaupage medium, cut out, place around parts of the board. Next cut out several small squares of chipboard glue together with hot glue til you have a 1/2 inch thickness, set aside.

6. Take several 1/2 thickness glue chipboard squares and hot glue behind each cut chipboard circus image, glue to your circus board. This gives your images dimension when gluing to your circus board.

7. Begin adding additional embellishments all around the board, creating mini vignettes around it. On the clay embellishments I added extra color using pigment inks, mixed media inks and fluid chalk ink pad. On the piccolo's and metal hardware I used smooch accent ink in frosted aqua to give more highlights to the hardware.

8. For the tags I used red toned scrapbook paper from trinity paper arts, cut into a tag shape, and aged the corners using vintage mixed media ink, the result resembled an old circus pullman cart.

9. No circus is complete without a clown, after some experimenting I pressed a clown cupcake topper into the moldable foam stamp block. The key to getting a deeper mold instead of a texture is to heat the moldable foam stamp block and extra 2 minutes, making sure you rotate the heat around the moldable foam stamp block sides and top to insure a perfect heat and no burn, then quickly press the clown cupcake topper into it and hold pressed for 20 seconds, voila, a re-useable mold. Now press w/makins air dry clay in white, let dry, paint and then glue to your circus board.

10. Finally add extra embellishments and glitter.
IMG_4917
 IMG_4923IMG_4924
IMG_4920
Tips and Tricks
-You can use a glue stick to adhere images to chipboard


-In place of vintage images, use various scraps of scrapbook paper then stamp circus scenes all 

-Try lining your whole board with circus tickets instead of images, age with a variety of              colorbox inks. 

-Alter a discarded or used game board using a variety of inks and embellish with all your fave pieces and found objects.
 IMG_4916IMG_4914IMG_4913IMG_4909IMG_4904
I hope this project inspires you to create a circus board of your own! Thanks so much for coming to mine!
xoxo
Lisa!