Tuesday, May 08, 2012

Design Team Project
 By Sherry Payne-Scott
 
Elfin Diorama Shadow Box
 
Materials
-Elfin parts, Lisa Kettell Designs  
-Recycled cake mix box
-Newspaper
-Decorative paper
-White birch bark
-Floral moss
-Tools: scissors, hot glue gun
-Glues: modge podge, hot glue


Directions
1.To create diorama start with a recycled cake mix box for your base.
2. Measure in a cut 1" in on both sides, folding the flaps in to make the inner depth. 
3. Decoupage the entire box with newspaper and modge podge.
4.Paint the shadow box black. cut decorative paper for the back side, hot glued it in place.


5. Take white birch bark tear it to size, place on the front edges and hot glue into place.
6. Attach loose moss, hot glue the bottom and bottom front pushed the moss into the glue (shake off any loose moss)
7. Then place 3 of LISA KETTELL'S Elfin heads and hot glued them into place.
8. Finally add a rock to make it look as if the Elves are peeking at you.


Princess Fish Media Mail Art
I cut an 8" fish shape out of chip board
I used LISA KETTEL'S pink swirl Cupie paper and tore little pieces to create the scales of the fish
I had an aqua paper and tore it into little pieces to add the blue for the fins
I decoupaged the pieces to create the scales and worked from tail to head
I cut the crown out of the paper, decoupaged it to a second layer to add structure to the crown , then attached the crown with decoupage glue
I attached a 1/2" google eye with hot glue
 

Enjoy!

Sherry Payne-Scott, AAS ID
__________________________________________________________________________
How fabulous are these fun projects, makes me want to go straight into the garden and build some enchanted and magical diorama's, tiny little homes for our Elfin and Fairy friends!
xoxo
Lisa

Monday, May 07, 2012


Design Team Project
By: Amy Mayfield

Let’s get crafty and go to the circus with a spoonful of stars–we can skip the $15 balloons.

Hey y’all! Today I’m tickled to show you a wood plaque turned into a marvelous circus as a project for the Lisa Kettell Designs Design Team. Get crafty, grab a spoonful of stars and let’s go to a circus where there’s no crying children or $15 balloons.

Supplies Used:
 
Unfinished Wood Plaque
Three Sheets of Scrapbook Paper from Lisa Kettell Designs
Lisa Kettell Fairy Follies CD

Lisa Kettell Sweet Shoppe Carnival Embellishment
 (unpainted)
Bakers Twine
Fiskars Banner Punch

Pink Pom Pom Fringe
A Ticket
Scrapbook Paper: Music
Scrapbook Paper: Dictionary
Stickles in Diamond
Glitter or Glitter Paper
Tiny Star Sequins


Directions:

The first thing I did was to cut a piece of Lisa’s scrapbook paper to use as the background. I cut a crown from another sheet of Lisa paper and painted the Sweet Shoppe Carnival. Sadly, while I can paint many things a straight-ish line is not one of them. Ditto for cutting a straight line; paper trimmers are my friend.
I glued a piece of glitter paper to the back of the carnival after using a knife to cut out the “door” area, I wanted it to open to something full of sparkles. I glued music down the side, glued in the crown and glued down the carnival. I chose the word brilliant from a page of dictionary scrapbook paper, pinked the edges and glued it along the top. The fairy came from Fairytale Follies CD. I carefully cut her out and used adhesive foam to give her a little dimension and then traced her with the Diamond Stickles.

She has silver stars dripping from her hands; they were attached via glue stick and given a little extra sparkle with the Diamond Stickles. Using my hot glue gun, I bordered the box with the pink pom poms and added the ticket. Using my banner punch, I cut out 5 pieces from another sheet of Lisa’s and attached it to the bakers twine with my glue gun. A dot in each corner holds the banner in place and allows it to hang freely. Because I don’t think you can EVER have too many sparkles, I traced each banner piece in the Diamond Stickles.
I recently read “The Night Circus” and between that and Lisa’s magical creations, found myself very inspired. If you haven’t read the book, pick it up! Also, Lisa has added some NEW collage CDs to her Artfire store and has some very affordable options. I picked up the Halloween one and am eyeing the Circus one and the Vintage Storybook and Ephemera Disc.

____________________________________________________________________________________
How amazing is this project that Amy did?, could have come straight out of a circus, I love love love it, Now to make one of my own, hmmmmmm, perhaps an elephant circus one!

xoxo
Lisa!

Friday, May 04, 2012

Design Team Project
By Marfi Bradford

Fairy Wishes Crown

I love crowns!The more outrageous the better:) I know it's still April but I thought this crown would be perfect for May day!
Ive created one using some of Lisa Kettell's amazing products.....

Supplies:
unfinished Baby Bailey doll by Lisa Kettell Designs
Charlotte doll head by Lisa Kettell Designs
cardboard crown template
assorted artificial flowers in your choice of colors
different sized butterfly picks
glitter butterfly ornament
glitter glue in gold, silver, pink, green
Acrylic paint in peach, brown and pink 
rhinestones
wish ticket
ribbon
hot glue
Directions:
Paint baby Bailey doll peach. Add details to face with brown paint, then paint in hair.Color in
cheeks with pink paint. Use pink and green glitter glue to make a skirt.Set aside to dry.
 

Begin hot gluing flowers to crown template, filling in empty spots with artificial leaves.Glue
ribbon to ends of crown (no more than 12'' on either side)

Once it's covered, hot glue butterflies to crown. Attach baby Bailey and Charlotte doll head
to butterflies.


Add wish ticket.Brush glitter glue onto ticket,  flowers, and dolls. Attach rhinestones.
Tips:
you can paint the crown template or cover it in decorative scrapbook paper
crown templates can be found online or at Jo-ann Fabrics and crafts store.
These are a great party activity for children, just use white glue and felt flower cutouts 
Click here to shop for the adorable doll parts used in this project.For more Design Team projects stop by Lisa's Blog and her website!
___________________________________________________________________________________
How amazing is this crown that Marfi created? I am over the top amazed, I can't wait to go and make one, think I need to have a fairy tea party and invite some friends to make one with me!
xoxo
Lisa

Thursday, May 03, 2012

Altered Composition Book
Romantic Book! 10
No matter where you go, you gaze eyes upon composition books, they are so cheap and in-expensive to buy, but let's face it, these diamonds in the rough need a facelift. A while back at CHA I assisted Beacon Adhesives on a project that Mike was teaching to a group which was altered composition books, using scrapbook paper, zip dry and flowers. I never finished mine, after a few months, I picked up my unfinished project and this is the result, a frou frou altered composition book with Dresden scraps, crepe paper, millinery and flowers.
Romantic Book! 9
Materials
-Composition book
-Scrapbook paper
-Scrapbook tags, labels
-Dresden scraps or vintage images
-Millinery and paper flowers
-Chipboard lettering
-Crepe paper
-Ribbon and trims
-Glues: zip dry, kids choice, liquid laminate, decaupage medium
-Tools: scissors
-Clear glitter, green flocking 

Directions
1. Coat one side of composition book w/zip dry, place scrapbook paper onto it and push to secure, then coat the spine and other side of the composition book with more zip dry and scrapbook paper.
2. Attach ribbons to the borders of the composition book leaving about 12 inches on each end in order to tie a bow.
3. Pleat 3 yards of crepe paper streamers, fold in half and twirl into a circle shape, glue in place with kids choice glue.
4. Apply decaupage medium to millinery flower leaves, sprinkle green flocking onto it, let dry.
5. Begin layering your composition book with Dresden scraps and images, trims, ribbons and millinery.
6. Apply liquid laminate to the images, let dry, apply more to the crepe paper and sprinkle clear glitter onto it.


Romantic Book! 8

Romantic Book! 7Romantic Book! 6Romantic Book! 5Romantic Book! 4Romantic Book! 3Romantic Book! 2Romantic Book!Now you are ready to begin writing inside your composition book, perhaps write down your bucket list, your craft ideas, your thoughts or your dreams.
xoxo
Lisa

Wednesday, May 02, 2012

How To Apply Snaps!
how to apply snaps2

As easy as it sounds, applying a set of snaps to a piece of ribbon, fabric or leather can be a task if you never did it before. Some packages give you instructions, while others do not.My first snap application went on backwards, lol, but after another run or two, I got the hang of it and yes it was easy, a snap.

Supplies
-Set of snaps
-Snap tool
-Brick or tile
-Hammer
-Hole puncher or Cropadile for leather
-Ribbon, fabric or leather of choice

Directions

 Step One: Punch hole at one end of the ribbon, about 1 inch in from the end
Apply Snaps, Step 1
Step Two: Match up the snaps, see photo example below
Apply Snaps, Step 2
Step Three: Place hollow side of the rubber snap tool onto a brick or tile, see photo below
(If you don't have a brick or tile, place on a concrete or patio floor)
Apply Snaps, Step 3
Step Four: Insert the rounded snap piece into the hollow rubber snap tool, see photo below
Apply Snaps, Step 4
Step Five: Place hole punched ribbon onto the snap, right side down, wrong side up ( the wrong side is the side of your material, that isn't the side that will show, basically its the underneath part of your ribbon.
Apply Snaps, Step 5
Step Six: Place the adjoining snap on top of the ribbon, see photo below
Apply Snaps, Step 6
Step Seven: Insert metal tool into the snap center, then hammer about 5 to 6 times, until the snap is connected. See photos below
Apply Snaps, Step 7Apply Snaps, Step 8Apply Snaps, Step 9Apply Snaps, Step 10
Step Eight: Punch Hole at other end of the ribbon, see below
Apply Snaps, Step 13
Apply Snaps, Step 11
 Step Nine: Flip the rubber snap tool over to the indented side and insert the next snap
Apply Snaps, Step 12Apply Snaps, Step 15
Step Ten: Flip the ribbon over so that the right side of your ribbon is showing, see below (this is the side where you will decorate over)
Apply Snaps, Step 14
Step Eleven: Place the ribbon onto the snap
Apply Snaps, Step 16
Step Twelve: Place the last snap onto the ribbon
Apply Snaps, Step 17
Step Thirteen: Insert metal snap tool, hammer 5 to 6 times until connected
Apply Snaps, Step 18
Step Forteen: Your snaps are attached
Apply Snaps, Step 19

Tips/Tricks
-Look for fun snaps
-Double up a bracelet and use 2 sets of snaps for an edgy look
-Use curtain tie backs for bracelet bases

 Now you are ready to either embellish your piece or wear it! Hope this helps you to attach snaps in your next project.


xoxo
Lisa


Tuesday, May 01, 2012

Design Team Project
By Amy Mayfield


I have been a bit obsessed with Halloween as of late. As of today, there’s barely six months to prepare! Where has the year gone?
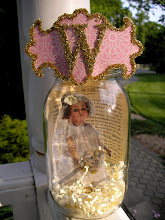
I had another project all planned out in my head for Lisa Kettell Designs  when I was rooting through my craft supplies and came across these wonderful witches; the  Kewpie Magic Witches from Lisa Kettell Designs. These come in handy because capturing a witch of your very own is tricky, witchy business and even these little ones are full of tricks and treats.
Supplies Needed:
Kewpie Magic Witches

Mini glass cloche (I took apart some ornaments I got on Christmas clearance that I bought just for the cloches. You could also use a small jar.)
Printed scrapbook paper
Thin cardboard
Stickles in silver, black and tarnished brass
A  letter from scrapbook paper or cardstock
Moss
Hot glue gun
Tiny silver stars
Black pompom fringe
Some sort of little adornment, I used a brass moon

I jazzed my witch up using the silver Stickles because witches love sparkles. Honest. I also popped a tiny star on the tip of her pointed hat and made her a “top” with black Stickles. While she dried, I used a paper punch to cut out two circles with pinked edges to use as a base. I cut out a circle from the thin cardboard and glued them together to make a base. I covered the top and bottom of the cardboard with the printed paper–which is important if you plan to use her as an ornament. Then I made a ring of moss around the base, using the bottom of my cloche as a guide since I wanted the majority of it under glass. When the witch was dry, I made a big dollop of hot glue and dipped her feet in it, pressing lightly until she was “set.” Then I glued some tiny stars around the moss because, in my opinion, you can never have too many sparkles.
Once everything was dry, I ran a line of hot glue around the bottom of my glass cloche and, carefully but quickly, moved it in to place. Using the glue gun and my small black pompom trim, I made a border around the base of the cloche. I glued my W, for witch of course, to the top of the cloche using its ring as the base. If you are making an ornament, I would run my ribbon or whatnot through the ring before attaching the letter. Then I simply glued the moon to the letter and with a dab of glue, to the glass.
Now my tiny witch is spellbound and ready for happy hauntings and magical mischief!
___________________________________________________________________________________
 
I love love love this project that Amy Made, how amazing is it? Love, now I'm ready for Halloween or some Harry Potter Magic!

Here's the link to buy some of the Kewpie Follies pieces so you can make this project too!
http://www.artfire.com/ext/shop/product_view/MoonfairesWorld/4405535/Kewpie_Magic_The_Follies_Value_Pack_20_Lisa_Kettell/Dolls_Miniatures/Miniature/Other 


or this link:

http://www.artfire.com/ext/shop/product_view/moonfairesworld/2596104/kewpie_magic__kewpie_witches_set_of_5__lisa_kettell/supplies/handmade_supplies/doll_making


Magic and Joy,
Lisa