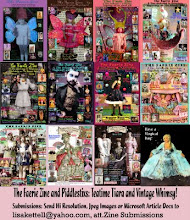

Piddlestixs Vol.6 is finally here after a year long hiatus, you can finally order the latest edition on/or before Monday September 30, 2013 at Lulu.com, where you can also purchase past editions in print or ebook downloads, including past editions of the Faerie Zine , Flapperology and Workshop Manuals.
All my magazines unless stated are available in children's book quality soft cover saddle stitched 42-44 page books and as ebook downloads. The newest release of ArtStixs Magazine is December 31, 2013 and will be filled with highlights from past editions of Piddlestixs and new releases, 155 pages of creative magic.
Please send ongoing submissions to: lisakettell@yahoo.com
To be considered for the latest ArtStixs release all submissions must be sent in by November 20, 2013, all submissions for either publication must have: "Mag Submission" in the subject line.
In this latest edition of Piddlestixs you will find a plethora of magical creations and projects revolving around Halloween, Wonderland, Carnival and Steampunk, all created by an incredible group of artisans!
xoxo
Lisa
Showing posts with label Piddlestixs. Show all posts
Friday, September 27, 2013
Tuesday, June 12, 2012
Sneak Peak Inside the Studio
Come join me for a sneak peak into my studio, where all my fave things can be found! Its always evolving with recycled shelving, color and my fave circus, storybook, kitsch and steampunk themes! Most of the furniture in the studio has been recycled or salvaged from destruction, even curb side pick up, keeping the decor of the studio and the whole store on a decorating budget is extremely important, especially in this economy!


Some of my shelves are filled with my own artwork, book samples, swap artworks, gifts, customer/friend handmade items, thrift store finds, purchases from my travels and my life long collecting!
Everyone knows I love vintage dolls: kewpies, cupies, charlottes, storybook animals, etc. so when I receive one or buy one, I can't wait to show it off in the studio, lol!
I especially love circus memorabilia, these tin cans came from two different locations both were ironically $2.00 each and hold some of my bits and pieces!


My studio is located on a former stage, as my store was a playhouse/theatre at the Turn of the Century, this adds to the magic of my studio space not to mention the history of it!
I hope you enjoyed a glimpse into my studio world, I'll be back with more studio photos and fun! xoxo
Lisa
I hope you enjoyed a glimpse into my studio world, I'll be back with more studio photos and fun! xoxo
Lisa
Tuesday, May 22, 2012
Exploring Around Piddlestixs
Now that the warm weather is here, the real magic begins at Piddlestixs, located in Historic Lafayette, NJ. Everyday I take a hike around the store visiting the sandy beach swimming lake, streams and scenery which engulfs Piddlestixs and neighboring stores, in the summer we even have workshops outside by the covered bridge and picnic area or on the porch, which is visited frequently from friends and loyal customers.


Here is a close up of the Sandy Lake near the store 


Walking around this area near my store is so peaceful, and feels like you are at the beach for a bit, yet you are in the country and right near my store! In addition there is a volleyball court and fields for sports, how fun is that? 


Come on by Piddlestixs for a visit soon, explore and leave with some magic!
xoxo Lisa
Labels:
exploring,
hiking,
Historic Lafayette,
New Jersey,
nj,
nj lakes,
Piddlestixs,
sussex county
Wednesday, May 09, 2012
Steampunk Goddess Necklace
By Joan Kettell
There is something so extraordinary about Steampunk and its many properties. It can have a timeless Neo-Victorian look, a bit of Apothecary Flare, A Horologist Essence, A Sci-Fi Twist, some Jules Verne Influence, Cosplay/Lolita Fun, Circus Oddity, Industrial Chic, Recycled Splendor, Wild West Mechanics, Alchemist Mystery, the Magic of Astronomy and Space, a Celestial Ride into the world of Moon-ology and you got Steampunk.
With this many options, who wouldn't want to start creating works revolving around this eclectic range of themes under one main roof. You can mix time gears, dials, industrial washers, and charms, viola you have a steampunk piece. Think of tiny bottles wrapped in wire for a necklace charm, hardware store washers embedded with stamped numbers, clock parts and casings filled with tiny eclectic scenes, top hats that are tricked out, boats and balloon travel, there are just so many places you can travel to within the realm of Steampunk.
The piece I am showing casing for you today is made by one of the greatest woman I know, my mom, Joan Kettell aka Aurora-tique who got infect by the Steampunk bug over 3 years ago, since then Joan has made over 2,000 pieces and has sold to customers world wide, taught some classes, been interviewed from various papers and media outlets all in an attempt to help spread the word on this fascinating subject.
Here are some more photos of her newest piece: Steampunk Goddess Necklace, which is now available for sale in the online store:
http://www.artfire.com/ext/shop/product_view/MoonfairesWorld/4678564/Steampunk_Goddess_Necklace_Celestial_Joan_Kettell/Jewelry/Necklaces/Metal
Here is the back of the necklace:
Here is the necklace in full view:
Here are some more pictures of Joan's newest Steampunk pieces, all available in the store on line or at Piddlestixs:
If you don't see a piece, then its sold out, similar ones can be made through custom ordering!
I hope you enjoy seeing a glimpse into Joan's Steampunk world!
xoxo
Lisa!
By Joan Kettell
With this many options, who wouldn't want to start creating works revolving around this eclectic range of themes under one main roof. You can mix time gears, dials, industrial washers, and charms, viola you have a steampunk piece. Think of tiny bottles wrapped in wire for a necklace charm, hardware store washers embedded with stamped numbers, clock parts and casings filled with tiny eclectic scenes, top hats that are tricked out, boats and balloon travel, there are just so many places you can travel to within the realm of Steampunk.
The piece I am showing casing for you today is made by one of the greatest woman I know, my mom, Joan Kettell aka Aurora-tique who got infect by the Steampunk bug over 3 years ago, since then Joan has made over 2,000 pieces and has sold to customers world wide, taught some classes, been interviewed from various papers and media outlets all in an attempt to help spread the word on this fascinating subject.
Here are some more photos of her newest piece: Steampunk Goddess Necklace, which is now available for sale in the online store:
http://www.artfire.com/ext/shop/product_view/MoonfairesWorld/4678564/Steampunk_Goddess_Necklace_Celestial_Joan_Kettell/Jewelry/Necklaces/Metal
I hope you enjoy seeing a glimpse into Joan's Steampunk world!
xoxo
Lisa!
Sunday, April 22, 2012
Fabric Remnant Banner
My store Piddlestixs, is almost 150 years old, its housed inside a former theater/playhouse, WWI weight station and General Store, so it has lots of character and history. The decor of my store Piddlestixs is unique and houses many eclectic themes from Wonderland, Circus, Kawaii, Tea and Steampunk/Apothecary. Piddlestixs has lots of re-cycled and up-cycled items and supplies for sale. In deciding on what kind of store banner I wanted in the front of the store, I opted for a vintage style banner to keep with the various themes and history of the store, the result was a banner using fabric remnants, chipboard lettering, seam binding and silver German glass glitter.
Materials
-2 sizes of fabric remnants, (found in fabric sample books or you can use fabric scraps)
-Black seam binding or silk ribbon
-Crushed velvet ribbon
-Decorative chipboard lettering
-German glass glitter, silver
-Glue: hot glue, modge podge
-Tools: hot glue gun, scissors, pinking sheers and pain brush

Directions
1. Decide on the name for your banner, I chose Piddlestixs, which is 11 letters, so I counted 11 larger pieces of scrap fabric and lined on the floor. Repeat this step for the smaller set of scrap fabric pieces.
2. If your remnants aren't already pinked, use pinking sheers and trim 3 sides of each of the remnants both large and small.
3. Measure a long strip of black seam binding or silk ribbon, place over the larger remnant's top edges, now hot glue to the large remnant.
4. Next hot glue the smaller remnant piece over the ribbon and the larger remnants.
5. Line the top of the smaller remnants with crushed velvet trim, for a more finished look.
6. Now add your chipboard lettering to each layered remnant, hot glue in place, coat with modge podge and german glass glitter.


Tips/Tricks
-Use Fabric tac in place of the hot glue.
-Use caution when using hot glue.
-Use wood letters in place of chipboard lettering
-Use scraps of fabric, sheets, bedding, curtains, table cloths or clothes in place of remnant books.


The possibilities are endless, this is a great recycle/upcycle project using items you might already have lying around the house, studio or store!
Enjoy,
XOXO
Lisa!
My store Piddlestixs, is almost 150 years old, its housed inside a former theater/playhouse, WWI weight station and General Store, so it has lots of character and history. The decor of my store Piddlestixs is unique and houses many eclectic themes from Wonderland, Circus, Kawaii, Tea and Steampunk/Apothecary. Piddlestixs has lots of re-cycled and up-cycled items and supplies for sale. In deciding on what kind of store banner I wanted in the front of the store, I opted for a vintage style banner to keep with the various themes and history of the store, the result was a banner using fabric remnants, chipboard lettering, seam binding and silver German glass glitter.
Materials
-2 sizes of fabric remnants, (found in fabric sample books or you can use fabric scraps)
-Black seam binding or silk ribbon
-Crushed velvet ribbon
-Decorative chipboard lettering
-German glass glitter, silver
-Glue: hot glue, modge podge
-Tools: hot glue gun, scissors, pinking sheers and pain brush
Directions
1. Decide on the name for your banner, I chose Piddlestixs, which is 11 letters, so I counted 11 larger pieces of scrap fabric and lined on the floor. Repeat this step for the smaller set of scrap fabric pieces.
2. If your remnants aren't already pinked, use pinking sheers and trim 3 sides of each of the remnants both large and small.
3. Measure a long strip of black seam binding or silk ribbon, place over the larger remnant's top edges, now hot glue to the large remnant.
4. Next hot glue the smaller remnant piece over the ribbon and the larger remnants.
5. Line the top of the smaller remnants with crushed velvet trim, for a more finished look.
6. Now add your chipboard lettering to each layered remnant, hot glue in place, coat with modge podge and german glass glitter.
Tips/Tricks
-Use Fabric tac in place of the hot glue.
-Use caution when using hot glue.
-Use wood letters in place of chipboard lettering
-Use scraps of fabric, sheets, bedding, curtains, table cloths or clothes in place of remnant books.
The possibilities are endless, this is a great recycle/upcycle project using items you might already have lying around the house, studio or store!
Enjoy,
XOXO
Lisa!
Friday, March 30, 2012
Up-Cycled Magic!
I restored this old cabinet, it was originally an ugly black and gray piece. I painted it with left over paints from Lowe's: coconut white and a light salmon pink. I choose to paint the inside the coconut white.
The top right corner was missing a ledge corner, the center was missing 2 medallions and had no knobs.
I molded the left corner edge of the piece, then poured with plaster, and attached to the right corner using wood putty and a few layers of spackle, once dried I sanded it!
Next I made another mold of the 2 medallions, poured it w/plaster and attached to the center doors with clear caulk, then I sanded some parts of the whole piece to show the original black paint that was underneath.
Finally I went to Lowe's and grabbed 2 crystal cabinet knobs, then attached them to the top drawer of the cabinet and to the center door. Now it plays host to my jewelry boxes and jeweled treasures.

This is actually a simple project you can finish in a weeked with in-expensive materials. I bought the cabinet for $5 because it was damaged. The paint was $3 a can since it was left over paint, the knobs were $2 each, the mold compound was $10 with a coupon, the plaster of paris was $3, Spackle, wood putty and clear caulk were left overs from another project, total for finished fabulous chic piece: $25 including the tax for everything!


This is a project you can do to old bathroom or kitchen cabinets, visit a dumpster, local junk/salvage yard, surplus store, thrift store, rummage/garage sale, etc. for furniture to re-do!
Happy Weekend!
XO
Lisa!
The top right corner was missing a ledge corner, the center was missing 2 medallions and had no knobs.
I molded the left corner edge of the piece, then poured with plaster, and attached to the right corner using wood putty and a few layers of spackle, once dried I sanded it!
Next I made another mold of the 2 medallions, poured it w/plaster and attached to the center doors with clear caulk, then I sanded some parts of the whole piece to show the original black paint that was underneath.
Finally I went to Lowe's and grabbed 2 crystal cabinet knobs, then attached them to the top drawer of the cabinet and to the center door. Now it plays host to my jewelry boxes and jeweled treasures.
This is a project you can do to old bathroom or kitchen cabinets, visit a dumpster, local junk/salvage yard, surplus store, thrift store, rummage/garage sale, etc. for furniture to re-do!
Happy Weekend!
XO
Lisa!
Subscribe to:
Posts (Atom)