Saturday, April 18, 2015

Infinity Forever!

Made with the threading.

Over the past few months I have been teaching a ton of Infinity Bracelet classes and I have to say, I am hooked. I created my first infinity bracelet a few years ago, over a 100 later, I'm still excited when I get a chance to make one and to teach it to others.

Recently I taught infinity bracelets at Michaels Stores using all bead landing supplies and beads via Halcraft USA.  I love the quality, styles and colors that Halcraft USA creates for the Bead Landing line at Michaels.  Their beading selection is fabulous and works in all my projects and workshops.

To make my version of the infinity bracelets you only need leather cording, thin wire, beads of choice and a clasp which is optional. I warn you, these bracelets are so easy to make and the results are so breathtaking, you will be hooked.  
Made with the threading.

I prefer using thin wire to wrap the beads instead of thin threading. I think the wire gives you more flexibility, more forgiving and looks nicer. Wire comes in so many colors and thickness today, as does leather cording. My students also prefer the wire and love the control they have with it opposed to threading.

Made with the thin wire.
In the next week I will post instructions on how to make your own using the leather cording, wire, and beads. This bracelet project could even become an anklet, belt or necklace cuff.

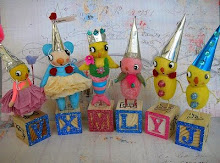
For now here are samples of the bracelets I made for the classes and some my students made using the technique they learned in my class.

xoxo Lisa

These are from a recent class. I love what Nicole
did to her bracelet. So soothing and peaceful.
Like sea glass at the beach. The Turquoise one
is inspired by Sedona.

Up close of Nicole's bracelet.


Tuesday, April 14, 2015

5 Minute Wood Necklaces


Wood laser cutouts are all over the place. From ornate scroll works, cute shapes and wording, wood has taken over. The variety of uses for these elements is endless. Every second an idea pops up. With the big emergence of the 80s and 90s again this year.

In the 80s some of my biggest memories were neon and bold colors, roller skating, leg warmers, strawberry shortcake, stickers and laser cut jewelry or accessories. For my sweet 16, my mom bought me an ornate laser cut mirrored album for my party pictures.

This project is a take on 80's style with a sweet modern update and takes only minutes to actually make. All you need are some wood word cut outs, paint, jump rings, chains and jewelry tools. With a few quick steps, you'll be skating away with your new name necklace.

Materials:

  • Laser cut wood name ( I used "sugar" and 'sweet"), Michaels Stores
  • Ready made 18 inch jewelry chains w/clasp, Bead Landing Michaels Stores
  • Jump rings, 6mm, Darice
  • Acrylic paint (I used cream, peach and aqua)
  • Jewelry drill puncher, 0.9 and 0.6 holes, Advantus Corp
  • Tools: needle nose pliers, paint brush, pencil


Directions:

  1. Flip the laser cut wood name over so the wording is in reverse. With a pencil mark a hole on each end of the laser cut wood name.
  2. Insert the laser cut wood name into the jewelry drill punch, line up with the marked holes and twist using the 0.9 drill punch. 
  3. Paint your laser cut wood names with colors of choice, let dry a few minutes. 
  4. Open up the ready made chain at the center using needle nose pliers, Attach the open chain to the laser cut wood names using jump rings.
  5. Your necklace is ready to wear.  
Tips/Tricks:

  • The jewelry drill press is light, small and easy to use. Many companies offer them and can be found at most craft stores in the jewelry or tool section of the stores and range in price from     $8.00-$17.00 and drill through most light woods, and metals. Advantus corp/Tim Holtz line has one available as well.
  • Coat your wood cutouts with glitter and nail polish clear sealer.
  • Cover your wood cutouts with rhinestones or sequins,
  • Wrap your wood cutouts with embroidery floss.
  • Gold foil, chalkboard paint, or wood stain markers give some fun to your piece.
  • Make your own chain or thread with beads.
  • Try cutesy animal shapes, crowns and mustaches.
  • Use flocking on your wood cutout.
  • Spray paint works well too.
  • Try rub on transfers or rubber stamps to add more detail to your wood cutout. 
I hope you enjoyed this project and get inspired to make your own. 


More projects coming this week.
xoxo
Lisa


Friday, April 10, 2015

Recycled Denim Journal Project


Recycling is what I do best. Here is a great project which can give a journal or drawing book new life, and a great way to recycle old, ripped or discarded jeans.

The first recorded use of indigo as a color name in the English language was in the year 1289. There is something so magical about the color of indigo which has a mix of blues and violets embracing it. Indigo is a color which has many facades. It can be romantic, mysterious, and mystical. It can call on fairies, goths and bohemians. Its vintage and modern all wrapped in one.


Materials:

-Jean/Denim pocket and scraps
-Discarded hard cover book, journal or drawing pad
-Ribbon
-Large metal safety pins, Michaels Crafts Line
-Adhesive page flags, Michaels Crafts Line
-Paper stickers, Flora and Fauna, Brenda Walton for K & Company
-Acrylic paint, ink spot color, Folk Art Paint
-Glues: hot glue, sturdy craft glue
-Tools: scissors, hot glue gun
-Other: metal tags, metal flowers, tiny metal cabochons, rhinestone bow, rhinestone pieces, jewelry findings


Directions:

1. Using the jean pocket scrap I covered my book's front cover and spine. hot glued in place. It fit perfectly around the front. I then folded the uneven edges over the cover and onto the other side.

2. For the back cover I added left over jean scraps from my scrap bag and hot glued in place. I layered a cut piece of muslin fabric to the inside covers to finish it off.

3. Now add decorative page tabs to the inside pages.

4. Tie a large ribbon around the center of the book, attach metal number tags to the ends. These are the book marks.

5. Embellish the cover of the book with large metal safety pins, paper stickers, tiny metal cabochons, rhinestone bow, rhinestones and metal flowers.

6. Enhance the book pages with ink spot color paint, ephemera, images and your fave mementos.


Tips/Tricks:

-Cover a blank journal or drawing pad and carry on your travels. Fill it with your adventures.
-Dye your jean scraps for more color choices.
-If you don't have jeans cover your book with fabric and make your own pockets.


This journal I created represents, friendship, love, and the magic of life. It will be filled with mementos that I acquire along my journey in creating a wonderful life.

I hope you enjoyed this project and come back for another visit.
xoxo
Lisa

Wednesday, April 08, 2015

Popsicle Stick Glam Bracelets

Popsicle sticks have reached a new high. We all know they work well in kids craft projects, but what about taking them to another level, wood bracelets. Thin wood can bend fairly well without splintering when placed in a hot water bath for a few minutes. When the wood is completely saturated in hot water it can bend.

With a few simple supplies you can bend popsicle sticks into fabulous bracelets for both adults and children. Once bent, stamp on them, roll in glitter, paint, wrap in paper or decoupage. This project is so fast and easy to make, so let's get started.
Materials:
  • Jumbo wooden craft popsicle sticks
  • Ornate wrapping paper or large sheet paper, Paper Source
  • Clip-on earrings, Forever 21 
  • Velvet ribbon, Simplicity
  • Drinking glasses or mugs
  • Glues; hot glue, industrial glue, modge podge, Plaid
  • The popsicle sticks inserted into glasses and drying for 24 to 32 hours.
  • Tools: hot glue gun, scissors, large pot, foam brush

Directions:

  1. Fill a large cooking pot with water, bring to a boil, drop popsicle sticks into boiling water, let boil for around 10 minutes. Reduce heat and let soak in the hot water for 5 more minutes.
  2. Remove popsicle sticks from water using tongs, let cool a minute. 
  3. Begin slowly bending the popsicle sticks and insert them into a glass or mug. Bend them into rounded shapes that fit around the inside of the glass or mug. You can even wrap one around the glass or mug and hold in place with elastic band or wire.
  4. Let dry for 24 hours to 32 hours, so they dry and hold their shape. Remove from glasses.
  5. Brush modge podge onto the front of the rounded popsicle stick. Fold a piece of paper over it. Let dry.
  6. Cut any extra paper and glue the ends on the back of the bracelet. 
  7. Hot glue 2 pieces of velvet trim to each end of the bracelet.
  8. Add a clip on earring to the center and your bracelet is ready to wear.
Tips/Tricks:
  • Add a bunch of popsicle sticks to the boiling water, as a few may break.
  • Always be careful when working with hot water or hot glue.
  • Try covering bracelets with washi tape, rub on transfers, stamps and vintage ephemera.
  • Paint or ink your bracelets and use rubber stamps to create wording or design of choice.
Hope you enjoyed this fast and fun project.  There are a ton of popsicle stick projects available on the web. This is my version of a classic kids project, made for adults.

More projects on the way and the new blog is coming along!
xoxo
Lisa

Monday, April 06, 2015

Patriotic Splash, Paper Cone Tutorial

"The American Flag is a symbol of our freedom, national pride and history" -Mike Fitzpatrick


"Patriotic Splash" is a paper project inspired by the seashore, vintage Boardwalk, and primitive summer patriotic holidays! This huge paper cone was made the w/sails and shells sampler pack from Canvas Corp., paper straws, wood accents, vintage ephemera and stained ribbon using Tattered Angels.

I recently came across a box of vintage ephemera containing old patriotic costumes, bathing beauty scenes, and seaside amusement. All ornate, detailed and some had color. Blues, whites, tans and creamy reds. Everyone of them screamed old boardwalk, old patriotic Americana with Memorial Day, Fourth of July and Labor Day scenes by the seashore. So inspiring and fun. The result was this project and a few others I will post soon, think bathing beauties and flags.

To make your own paper cone you could photocopy the template out of my mixed media art book: "Altered Art Circus", Quarry Books, Lisa Kettell. If that''s not available to you, here is the full set of instructions to make a paper cone and this project.

Materials:

Directions:

  1. Starting from one corner, roll a 12 by 12 inch piece of scrapbook paper into a cone shape. Hot glue in place and cut any excess paper. Fill with light blue paper shreds, set aside.
  2. Hot glue a 12 inch piece of white paper floral wire to each end of the paper cone, arching it around the front. Cut various square shape images from the scrapbook paper, and hot glue to the white paper floral wire to form a banner.
  3. Attach a crescent moon shape to a paper straw to make a wand, set aside.
  4. Begin dying white or light color cotton ribbon with fine wood spray ink. Spray until desired ink color is achieved, let dry. Then tie to the crescent moon wand and insert into the paper cone, hot glue in place. 
  5. Cut a 2 inch by 12 inch strip of seer sucker scrapbook paper from the scrapbook paper pack. Begin cutting fringe into the cut paper strip, when complete, hot glue to the paper cone rim.
  6. Layer your cone with more images cut from the scrapbook paper, vintage image and ephemera.
  7. Make a paper fan rosette from the scrapbook paper, add that to the paper cone.
  8. Finally embellish with German glass glitter and a wire to hang your paper cone. 

  9. Tips/Tricks:
  • You can make smaller sized paper cones, paper cone wreaths, paper cone banners.
  • Turn your cone into a seaside party hat or large table center piece.
  • Add shells and more ephemera to your paper cone.
  • Distress your paper with more inks. 


    I hope you enjoyed this project and get inspired to make your own version.


    Happy Monday,

    Lisa xoxo

Saturday, April 04, 2015

DIY Peeps Wands

Its that time of year, Easter and Peeps.  I love the adorable shape and sweet taste.  I needed a way to preserve these sweet delights to enjoy year round, the result Peeps as craft embellishments.  Using peeps in crafts is a great way to recycle any leftovers that never made it to the mouth, lol.

Every year I head to store and purchase a stash as soon as they become available for purchase. I save some for sharing at the Easter table, the others I open up the packaging and let air dry for a week so they are ready for crafting.

This project is fast an easy to do using paper straws, stale peeps, and lace ribbon ( I dyed with Rit Dye).  If you are looking for a creative way to serve edible peeps at the Easter dinner table, you can repeat this craft without glue and with fresh peeps opened the day of Easter. Sprinkle with edible glitter or colored sugar for more pizzazz.

To make your own Peeps Wands visit my step by step project on the Rit Studio site by clicking on this link: DIY PEEP WANDS

Other projects you can make are cards embellished with peeps, Spring/Easter assemblages, garland, banners.  Line a wooden frame with peeps.  What about peeps jewelry? Or how about peeps in a jar. Peeps in a box or peep crowns.

If you can't resist the urge to not eat your peeps for craft purposes, then make your own out of air dry clay such as model magic from Crayola.

 Hope you felt all the cuteness from these projects and head over to my tutorial at RitStudio.com to make your own.

xoxo
Lisa

Thursday, April 02, 2015

Come Sail Away, DIY Large Driftwood Boat


"Come Sail Away" with me on a seaside adventure. This project is for a large 3 foot driftwood schooner boat made w/products from Canvas Corp Sails & Shells line, 7Gypsies trinkets, ink from Tattered Angels, shells and driftwood I found last week near my house. This boat is now sitting proudly in my loft space!
The benefits of living in NJ, means quick access to many lakes, and the shoreline. Some rivers such as the Raritan river stream to the bay, which extends into the Atlantic ocean at the Perth Amboy points of the state. Whenever I get the chance, I head over to Duke Island Park to explore and look for natures gifts and washed up treasures such as sea/river glass, tile shards, coins, shells and drift wood, which stream up line from the bay and wash up onto the land edges.


After a storm or high water, is the best time to explore, as new treasures surface. I never know what I will find on my exploration. This always leads to inspiration and a bevy of project ideas such as this project. After receiving a fabulous package of paper and goodies from Canvas Corp., line of products, I new my found objects would become a form of art.

I stumbled onto several pieces of driftwood, and new they were destined to become a large boat assemblage, the result this project; "Come Sail Away".
 Materials
  • 2 large pieces of driftwood or thick tree branches
  • Scrapbook paper, Sails & Shells Sampler Pack, Canvas Corp 
  • Findings, clothes pins, 7 Gypsies
  • White paper floral wire, seer sucker bakery twine (Hemptique), trims and muslin fabric ribbon
  • Shells, tiny starfish 
  • Parchment color treat box, vintage sailor ephemera
  • Inks from Tattered Angels (fine wood, aged mahogany)
  • Tools; scissors, hole punch, thin nails, hammer, hot glue and hot glue gun
  • Extras/Optional: German glitter, small branches, tags, metal grommets, grommet setter, ink pad and number/letter stamps, cotton pad or cheese cloth for inking

Directions
  1. Decide which piece of driftwood will be the base and which one will go on top.  Then hammer thin nails into the two pieces of driftwood to hold in place. I used 3 nails. Hot glue any openings for extra durability.
  2. Crinkle a piece of parchment earthy color paper from the scrapbook sampler pack, punch two holes into one side of the paper. (one hole at the top, one hole at the bottom).
  3. Cut 2 pieces from fabric ribbon measuring 12 inches each. Thread through each punched hole and tie onto the upward piece of driftwood.  
  4. Hot glue a treat box to the middle of the upward piece of driftwood. Insert a small branch into it, decorate with tiny shell, vintage sailor image and wording from the paper sampler pack. Again, hot glue in place. 
  5. Cut small rectangle strips from another sheet of paper in the sampler pack, hot glue to the bottom of the sail, line with trim of choice. 
  6. Attach a piece of white paper wire to the top of the upward branch, and one end at the bottom right of the downward branch (the base). Cut triangle shapes from more paper and hot glue to the wire. 
  7. Stamp lettering onto the muslin fabric paper sheet and cut into tile shapes. Trace two tag shapes onto the same fabric, cut. Then add metal grommet, and stamped tile shapes to the tags, tie to the top left of the sail with bakery twine. 
  8. Create an anchor shape onto the front of the sail with more paper.
  9. Spray tattered angels ink of choice into a cheese cloth or cotton pad, spread all over the edges of the sail and any areas you want aged or distressed.
  10. Finally find a space in your home or studio for your driftwood masterpiece.
 Tips/Tricks

  • For a truly sturdy boat use clear caulk and caulk gun where the nails and branches are.
  • Try nautical ribbons instead of the muslin fabric ribbon.
  • Created various sails instead of one large one. 
  • Add more pieces of driftwood to form a larger boat, wider boat or make a row boat base.
  • Add German glitter and chipboard lettering.


Stay tuned for more driftwood projects this weekend. Smaller in size, fast and easy to make, perfect for table settings and memory projects.

xoxo
Lisa