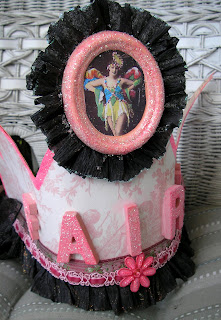
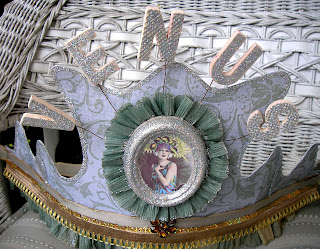
The Tiara/Crown Tutorial!
Hello All,
As I promised, here is a tutorial for making paper or fabric crowns.
Materials:
-Large Poster Board Sheet, Any color (or) Sturdy Cardstock
-Generic Paper/Cardstock
-A multitude of designer Papers or Fabric ( Designer, Scrapbook, Wallpaper, or Contact Paper, basically prints which you like)
-A variety of Vintage Images
-Fabric Trims: Scraps, Tinsel, Holiday Tinsel Garland, Sequims, Ribbons, Etc.
-Glue
-Paints, Inks, Glitters, Glitter Pens/Glues
-Gesso and Gel Medium
-Scissors: tiny and regular sizes, decorative (optional)
-Oddities: Jewelry Bits/Findings, Rhinestones, Metal Pieces, letters: Foam, Wood, ChipBoard, ect.
1.Measure your head, to determine the size of your crown.
2.Make a Pattern for your crown. Go from classic point top, to large and wavy, the choice is yours. See my crowns for examples or research crown/tiara shapes on the computer or book store.
3. After you have traced your pattern onto the poster board, cut it out.
4. Now apply some generic paper in anycolor to the poster board crown on both sides with glue, making sure to get all the bubbles out. A brayer or rolling pin works well, let dry!
5. Now apply a layer of gesso to both sides, let dry.
6. Next find paper that you like and apply to the poster board on both sides with glue, again rolling out the air bubbles. Try using a mix of papers for a more unique look. Example: The inside of the crown could be beige paper and the outside main part could be striped paper.
7. When glue is dry, apply a layer of gel medium to both sides of the crown. This gives the piece flexibility, to bend with out distorted cracks or weird paper bubbles and lines.
8. When Gel Medium dries, you are ready to paint, embellish, decorate your crown.
9. For crown security and to keep on your head, I glue ribbon to the middle of each crown end, so I can tie it closed with a bow. Example: think of how you tie and apron closed.
10. Last Step, get a cup of tea, find your favorite chair and put on your crown that you made, which is fit for a Queen!




















5 comments:
I've been wanting to make one of these and did not know about the gel medium step. I really appreciate the tutorial you provided! Thanks. I've added you to my list of blog links.
Charity
I've experimented with these crowns. I made one with just paper and glue and even with pushing out the glue, I had bubbles, creases and streaks. Then I used a rolling pin on a flat surface and rolled out the glue. That worked great.
When I applied the gel medium, I was so excited. It made my crown flexible and eliminated those ugly paper creases!
I'll add you to my blog list too!
Hello Dear One!!! Just stopping by to say hello! We have had a crazy summer, and it's only going to get nuttier, so I am trying to sneak in some time to visit my bloggy pals!!
GREAT tutorial!!!!!
xoxox
Hello my friend, long time no hear, so glad you came by to visit. I'll check in tomm. on your blog, as I have been crazy busy with commissioons, the zine and new surprises!
hugs!
Lisa!
Just out blogging and wanted to drop in. Love the crowns will have to make one. If you don't care I like to list your blog on mine. So much to see .
Love Debb
Post a Comment