Peeps are marshmallow candies, sold in the United States and Canada, that are shaped into chicks, bunnies, and other animals. They are produced by
Just Born a candy manufacturer founded in
Bethlehem,
Pennsylvania, by Russian immigrant
Sam Born.
In 1953, Just Born acquired the Rodda Candy Company and its marshmallow
chick line, and replaced the process of hand-forming the chicks with mass production.
Soon Just Born, was considered the "largest marshmallow candy manufacturer in the world." The yellow chicks were the original form of the candy, then new
shapes other than the chicks were produced following a theme according
to the season starting in the 1960s. Twenty years later, the Marshmallow
Peeps Bunny was released as a popular year round shape of the candy.
I have been a long time fan of the kitschy sweet bunny peeps. My Mom and Grandma would put edible German Easter Candy grass in a basket and fill it with peeps and other Easter treats usually from Woolworths or Newberrys Dept. Stores.
As an artist and advid recycler I save everthing and try to reuse what I have in my projects. Recently I came across a box filled with un-opened packages of peeps from last year. I remembered buying them on clearance for 25 cents a box. The pink bunnies are so cute and asking to be saved from snack time. Each one looking like one of the chartacters from my art stories. I knew they would fit in perfectly with my Easter projects.
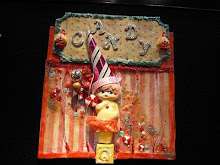
The first in the series of projects is called "Peeps in a Box." For this project I recycled last years peeps and
their box and turned them into a fun Spring assemblage. I lined the peeps box with scrapbook papers, peeps, paper straws and shredded paper grass. This project is perfect to do with your kids, with friends or yourself. It teaches recycling, initiates crafting, and rings in the Easter holiday. Best part of this project is you can make it
within 15-20 minutes.
Materials
- 1 box of pink bunny peeps
- Pink pom poms
- Scrapbook paper
- Scrapbook embellishments
- Shredded paper grass, pink
- Paper straws, pink/white striped
- Pink acrylic paint
- Tools/Glue: scissors, hot glue gun, hot glue sticks
- Other: fabric spray stiffner, ribbons, wire ribbon, mini plastic chicks, wax paper
Directions
- Remove the pink bunny peeps from box, separate from each other.
- Place the peeps on wax paper and spray with fabric stiffner, let dry. This helps harden the peeps. For this project I used last years hardened peeps.
- Paint over any white areas of the peeps with pink acrylic paint, let dry.
- Glue pink pom pom to the back of the peep, tilting to the left.
- Measure the inside of the peeps box and cut a piece of scrapbook paper to fit inside it, ahere with hot glue ot glue of choice.
- Line the bottom of the peeps box with shredded pink paper grass, secure with hot glue or clue of choice.
- Decorate the box with additional scrapbook paper embellishments, wire ribbon, paper straws, and peeps.
Tips/Tricks
- You can air dry the peeps by cutting open the box and letting the air hit them for a few days or a week.
- Try photo copying your peeps and print onto sturdy weight paper and use them in place of the real peeps.
- You can use clay, paper mache or paper to make your own peeps. Coat the finished clay peeps in paint, mod podge and pink sand. There are some bunny type molds you can use to fill with plaster of paris for another version of the bunnies.
Company Products Used:
- I used Crate Paper for the kitschy tag cut outs, Clearsnap/Colorbox for the Party cut out and EK Success for the background Scrapbook paper in this project. I bought mine at ACMoore.
- I used pink acrylic paint from Plaid.
- Orange pom poms were dyed with petal pink and fuschia Rit Liquid Dye
- The thin shredded pink paper was from the dollar store.
- I used white floral wire to make my banner.
- The paper straws are from Michaels.
 Bunny peeps come in others colors besides pink. Blue, purple, and yellow are some of the other colors they come in. This project can be made using any color or variety of peeps.
I will be posting 4 peeps projects over the next few days to get you inspired to recycled and have fun using peeps.
xoxo
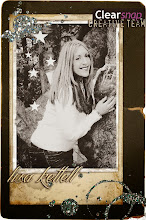
Lisa
For more info on peeps visit:
www.marshmallowpeeps.com
To purchase items from my store visit:
www.artfire.com/ext/shop/studio/MoonfairesWorld


 Caldwell College book signing


 Directions