Showing posts with label design team. Show all posts

Wednesday, April 09, 2014

LK Design Team Project by Marfi Bradford: Peter Pan Book/Puppet theatre

Do you believe in fairies?
I think you all know that I do!
Here's a Lisa Kettell Designs Team project
that has everything you need to help you believe! 
-Marfi Bradford
Supplies
  • Cigar box or book shaped box (available at craft and hobby stores)
  • 2 Baby Bailey unpainted dolls
  • Fairy silhouette
  • wooden scrolls/trim
  • alphabet stickers
  • England stickers*
  • gold glitter washi tape
  • purple ribbon
  • treasure map
  • hot glue gun, glue sticks
  • white glue
  • glitter in gold & pink
  • craft wire
  • green scrapbook paper
  • acrylic pant: white, peach, orange, gold, pink, red, light green, dark green, dark blue, brown, black
Directions
  1. Paint baby bailey dolls to look like Wendy and Peter. Then hot glue purple ribbon to top           of her head, add pink glitter to top of her ankles.
  2. Next fold a small amount of green paper to resemble a hat for peter, hot glue to his head       poke craft wire into back of dolls, set aside.
  3. Paint the wooden trim gold and add glitter. Paint inside of box dark blue and add white to create clouds.
  4. Position Big Ben sticker in front of the clouds, or, paint him on. Then glue green paper to       lid of box, paint outside of box gold. 
  5. Open box add washi tape across the top and hot glue wooden trim to frame inside of box.     add stickers and silhouette to box lid to create the cover.
  6. Put a small amount of hot glue on tips of the wire attached to the dolls and position them         to look like they're flying. 
  7. Add treasure map to inside lid and dry brush gold paint on corners of cover and the map.
Hope this was fun...I've been outside most of this week adding arches and making a bed out of
bent wood and an iron cot! When it's ready it'll be covered in vines and flowers. -Marfi Bradford


I hope you enjoyed Marfi's project for the Lisa Kettell Design Team.  Her work is filled with so much magic, enchantment and joy.  I just love this project. To create your own using some of Lisa Kettell Designs products visit the artfire shop at: http://www.artfire.com/ext/shop/studio/MoonfairesWorld


Stay tuned for more Design Team projects this week!
xoxo
Lisa


Wednesday, January 22, 2014

Design Team Project by Tanya Watts


Materials/Instructions:

Gather everything you can get your hands on! RAID your sewing box, button jar, garden shed, toy box, packaging, lace, old material, twine, Lisa Kettell doll parts!! Tim Holtz metal pieces,...

Canvas, gesso, acrylic paint, string glue, I used Ranger's Glossy Accents, spray bottle with water, perfect pearls, mini misters, distress re- inkers (there are a lot of pearlescent mists out there but I still love to make my own), cheap paintbrush with long soft bristles ( to get into the most impossible places), gilding wax, Tim Holtz distress paint, I used the metallic ones, Distress glitter or glitter of your choice

Start by painting the canvas with gesso, let dry or if you are like me grab your heat gun!
Using gesso, collage papers, lace, material, ... down to make your background, just for a bit of textured interest.
Leave to dry or... Yes! Grab your heat gun! Just be careful not to bubble up the gesso unless you like that look, which I actually do.

Start adhering all your precious finds, make a design that pleases you but don't overthink it! Go with your feeling! Remember to incorporate you Lisa Kettell Design doll parts, they give it that special touch!
Leave to dry! This time keep your hands off that heat gun! I leave it for a few hours or overnight because that way I can't get impatient!


Okay, if you are anything like me, get up at 5:00am to continue! Seriously I did!

Now cover everything with gesso, get into all the little nooks and crannies to get every little piece of surface covered. Now you can reach for your trusty heat gun or leave to dry.
Assure it is really dry, unless you want gesso in your paint ( yes, I got gesso mixed in my black paint, but it actually looked good because it gave it depth)


Paint the whole canvas with acrylic paint of your choice and color, I used Adirondack paint dabber black, but by all means experiment with you favorite color.

You really need to be patient, get into every single spot, turn the canvas around to see it from a different angle, tilt it now and again to find all the white spots that you missed!
Heat gun! Or leave to dry.

Now come the metallic distress paints! Shake well, the mixing ball is in there for a reason! Unscrew the top( dabber and all) there should be paint in the part you screwed off, this is all you need, shake the top to splatter paint onto your canvas, use one or more colours.
Spray with water to let the paints react, move and tilt your canvas for drip page effect. Dry with heat gun. If you see pools of colour you don't like then just dab with paper towel.


Pearlescent spray: put one dropper of Distress Ink re-inker into a mini mister, add perfect pearls, as much or as little as you like, I just use the tip of my scissors as a scoop and I usually add 2 scoops. Fill with water, not all the way up, leave a little space, it will help with the mixing.
Shake it shake it shake it ( like a Polaroid picture!)


Mist onto your canvas as you please and again move and tilt for  drippage effect.
 You probably will grab for your heat gun right now... Your good!
Who has time to let things dry??

Rub some ( dry) perfect pearls onto the raised areas, I used a few different colours, be sparse, you really need a little! I use my finger tips and just use what is in the lid.
Buff up with a cloth or piece of kitchen paper. You can also ad some gilding wax here and there.

Add a small word that pleases you, cover with Glossy Accents.
I glittered part of the moon. Glittered the pearl I put in one of the shells
I added a metal phrase at the bottom.
Et voila!

Love & Peace

Tanya Watts
Wattstanya@ icloud.com
tanyawatts.blogspot.com
____________________________________________________________________________
Hope you enjoyed Tanya's project for the LK Design Team as much as I did. Visit her site for more amazing works.

Tuesday, December 24, 2013

Angel Lulu and The Gingerbread by DT Member Marfi Bradford


Today I'd like to showcase returning DT Member Marfi Bradford’s two Design Team projects using Lisa Kettell Designs (LKD) products. I can't pick a fave, love them both.

 The Gingerbread House Project:

Materials:
Directions:
  1. Paint a paper mache house shaped box with gingerbread and ivory paints. 
  2. Then attach glittered candies, stickers, lace trim and a cupcake to the painted house with glue.
  3. Next paint the Tristan style doll heads brown and glittery.
  4. Finally add them to the gingerbread 'cookies'.
 Angel Lulu Project:

The next project is an ornament
created using Marfi's favorite embellishment, carnival Lulu.

Materials:
Directions:
 
  1. Hot glue  glitter tinsel around the 5 inch wooden circle.
  2. Next hot glue a Styrofoam snowflake to the front of the circle.
  3. Paint Carnival Lulu embellishment, add wings, skirt and tiny Christmas tree.
  4. Hot glue her to the snowflake.
  5. Finally, add a pipe cleaner to the back of the circle to make a hanger.

"I hope you get a chance to try out these projects..they're super fun to make."-Marfi


For more products visit:
Moonfaires World/Lisa Kettell Designs

Saturday, December 21, 2013

Cupie Stick Pins by DT Member Kim Smith


Today I am posting a project from returning DT member Kim Smith, who created this whimsical set of stick pins using Lisa Kettell Designs products. These can be used in almost anything. Add these stick pins to a project, scrapbook layout, assemblage or insert in cupcakes or just jazz up a party.

Here is Kim's Project:

Need a cute, quick, easy project to give as a gift, wear as a hat or lapel pin or accent your altered art? I made these Cupie Head Stick pins using items from LisaKettellDesigns...want to know how I did it? Here you go....

Materials:
  • Cupie Dollheads, LKD (Lisa Kettell Designs)
  • FrouFrou Stickpins, LKD (Lisa Kettell Designs)
  • Green Glitter Stars, LKD (Lisa Kettell Designs)
  • Glitter..I used white, pink and blue
  • Paper Flowers
  • Rhinestones

Directions:

  1. Take Frou Frou stick pin and gently slide it into  the Cupie Doll head. Check to be sure it's where you want before you continue.
  2. Put a thin line of white glue on head and sprinkle with glitter. Add rhinestone accent. 
  3. For Cupie Flower Stickpins, glue bottom of pin to star, add glitter and paper flower. 
  4. What next? Add more glitter! (be careful when working with the stickpin, you can add a pin keeper to the end to prevent getting poked and to finish the artpin.)


Cupie Dollhead Stickpins are shown on LKDesigns Bingo card, also available in the 
shop

Friday, December 20, 2013

Yule Fairy Box by DT Member Wendy Aspinall


Today I am showcasing another design team project from our newest DT member Wendy Aspinall. Her Yule Fairy Box is fabulous and ready for you to make. Create your own version using some of the products from the Lisa Kettell Designs line found here: http://www.artfire.com/ext/shop/studio/MoonfairesWorld


Wendy's Yule Fairy Box

If you like to play too here's what  you'll need :

Materials:
  • Paper mache box ... any shape
  • Flora picks  I used a  glittered twig  and leaves 
  • Moss
  • Alcohol ink ( brown)
  • White tulle
  • Small snowflake  broken  to make wings
  • Small paper flowers
  • Tinsel
  • Silver glitter
  • Page from an old book 
  • Small piece of lace
  • Frozen Charlotte, Lisa Kettell Designs 
  • Fancy frou frou pearl pins, Lisa Kettell Designs 
  • Glitter stars, Lisa Kettell Designs
  • "Fairy" word taken from fairy follies CD, Lisa Kettell Designs


 Directions:
  1. Add the old book page to both the top and bottom of the box , glitter the side of box and lid.. put aside to dry.
  2. spray frozen Charlotte with alcohol ink .. let dry. 
  3. cut and fold the tulle in to ten layers , sow together  at the top with a running stitch... pull up to made a skirt  and add to the doll.   Using the lace  wrap around the top of the body, secure with dab of hot glue at the back.. add wings.
  4. Make hat with more book paper, secure with hot glue to head.  Add flower to skirt and to hat.
  5. Add some tinsel to the pearl pin  and bend wire around a paint brush  to curl it.
  6. Make a small hole in top of lid and glue in the twig pick. glue down moss , glue doll , wand , small leaf and flower , glitter stars. 
  7.  Lastly add the word, fairy to one of the stars. 

Tuesday, November 19, 2013

Design Team Spotlight, Meet Wendy Howell

Meet our new design team aka creative team for the 2013-2014 roster. Today I'd like to introduce you to Wendy Howell
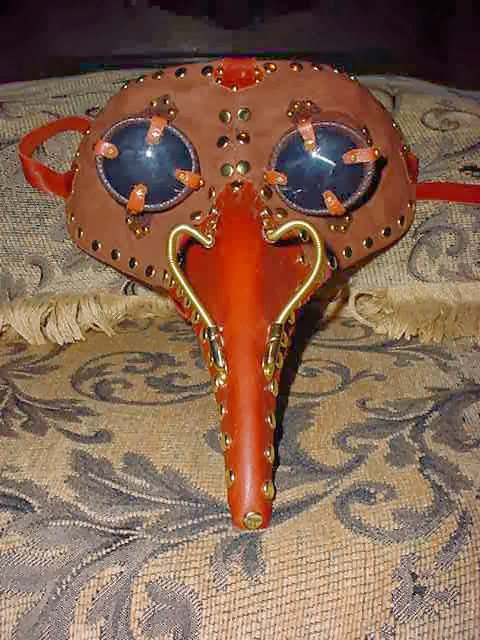
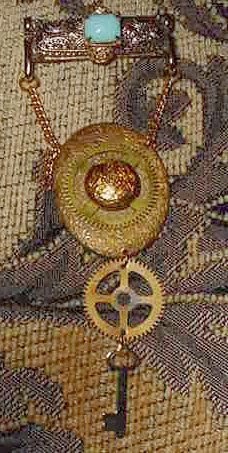
I'd like to introduce you to our newest team member Wendy Howell aka The Craft Store Reject as she is known on her blog.  Wendy's mixed media creations revolve around a steampunk and edgy theme. Many of her pieces are made using recycled pieces mixed w/ various artsy elements. From jewelry to paper craft, Wendy puts a unique spin on the works she does, making her a wonderful fit for the Design Team.

Her creative imagination, and edgy style brings a  unique vibe to the Lisa Kettell Designs Brand.

I can't wait to see what Wendy thinks up in the coming weeks. Here is a sneak peak of some of her amazing works!


A little bit about Wendy:  


I'm a crafter/artist. I work in many medias, mostly Jewelry and paper arts. I use a lot of reclaimed/recycled materials. I've been crafting in one form or another since I was a child but only seriously got into it in the last 13 years. 

I used to teach classes at Michael's and JoAnn's. I taught polymer clay basics, Jewelry making, glass etching, paper crafts and loom knitting. -Wendy


Visit Wendy at: 
Stay tuned for our final design team member spotlight.
xoxo
Lisa