Tuesday, March 31, 2015

DIY Vintage Transfer Pillows

For a few months I have been wanting to make DIY Vintage Transfer Pillows. I turned muslin fabric craft totes into vintage pillows w/ black/white copies, wax paper, heat and stuffing! Whole project cost $10 for 4 pillows!
This project can be done a variety of ways. Instead of wax paper, you can use stencils, stencil brush and black paint. Try a black and white photocopy, transfer paper, stylus and a black sharpie. Iron on transfer paper works as well.

Materials:

-Wax paper

-Printer paper

-Ink jet printer

-Image or lettering of choice

-Bone folder or painting scrapper

-Muslin fabric craft tote

-Pillow stuffing

-Paper spray adhesive of choice

-Tools: scissors, sewing needle, sewing thread, heat tool


Directions: 
  1. Choose a few images or lettering labels you want to print. (visit my flickr gallery for a bunch of free collage images) 
  2. Cut a few pieces of wax paper to 8.5 x 11 inch sheets. Attach the cut wax paper to the same size computer paper using spray adhesive. Load into your computer printer. Make sure the wax paper part is the area that gets printed on when it comes out of the printer. (Doing this makes printing the wax paper easier) 
  3. Before you begin printing, make sure you switch your printer settings to mirror images, so that the wording or images print in reverse. 
  4. Carefully remove the printed sheets from the printer, making sure to hold the ends, away from the ink, as the ink stays very wet. 
  5. Place the wet side of the wax paper onto one side of the muslin fabric craft tote, then using a bone folder or painting scraper, press/rub down onto the paper until the ink has transferred to the fabric. 
  6. Remove the paper and using a heat tool or blow dryer, add some heat to set.
    Cut the tote straps, fill with pillow stuffing and stitch close. 


    Iron on Paper Transfers:

  1. Replace the wax paper and printer paper with iron on transfer paper and print. (remember to click on the mirror settings on the computer before printing)
  2. Then iron onto the fabric, stuff, stitch.
For Transfer Paper and Sharpie:
  1. Print your image on regular printer paper. No need to mirror image.
  2. Place a piece of transfer paper onto the fabric and layer the printed image onto it, with printed side facing you (Blank side down against the transfer paper).
  3. Trace the image onto the fabric using a stylus or pencil. Remove both papers.
  4. Fill in the transfer with a black paint pen or sharpie. 

    Stencil and Paint Transfers:
  1. Buy paint stencil online or at craft store.
  2. Using a stencil brush and black fabric paint, stencil on the fabric.

Tips/Tricks:
-Try color images
-Photocopy ticket stubs such as a first movie date, wedding table number, broadway or sport tickets for a fun memory pillow.
-Create fabric banners, or print on wood.
Hope you enjoyed the tutorial, so many possibilities, Love to see what you make. I have my pillows on the couch and sitting chairs.  I've even used them to showcase my jewelry wares. Now onto the next crafting adventure.

xoxo
Lisa


Friday, March 27, 2015

Exploring Creative Photography

Photographing products can be a tough task.  Too basic of a color, too busy of a background, poor lighting conditions and shaky hands can produce less then stellar product photographs.  Most designers put careful time in creating a piece and are excited to share its completion. Your photographs of it need to be just as creative as the piece and showcase your design style.
A clever way to showcase your jewelry designs and brand message.
Here I created a heart from my jewelry designs and filled it with
photos that paint my story. Explore, Create, and Live Free Spirited. 

Choosing the right colors and themes can be overwhelming.  If you create fun and flirty jewelry, your backgrounds need to reflect that mood in order to compliment your piece.  With the rise of social media, designers of every degree are utilizing the benefits of social platforms to promote their product and create a brand awareness.

Instagram is a great visual platform for capturing everything we do in the current minute. Clogging your IG feed with more then 3 or 4 pictures of the same thing at the same time can be shunned upon by fellow Instagramers, who crave varied inspiration to retain their commit to follow.  Its very important to choose "the perfect picture" to capture your message to your audience.

Blogging, Facebook, Pinterest, Twitter, You Tube, Vine, Flickr, and Websites are some of the larger social media platforms designers are using to get their brand across.  Smart phones are replacing the everyday camera at a fast pace. Why, you might ask? Because you can instantly download to one of these sites and share that current moment.
Pay attention to the details you want to showcase. This dress
screamed vintage prom and the focal point was the fabric and
the center details. One photo was enough to portray that point.

Thinking out of the box is essential. Having great photo enhancing apps is key. Mix these two together and any photograph can be creative and eye catching.  I have been an Apple Iphone lover since the beginning.  I currently use it to take most of my pictures for social media.  After I select the set I want to share, I load them to my fave social media sites and tweak. Then I caption and upload to social media.

I play with colors, textures, props and lighting to get the look I want.  Frames, chalkboard prints, scrapbook paper, and signs play big roles in my product photography sessions.  If the lighting seems dull, I load the photos into editing apps and correct them.

Details, I love up-close details, they are in themselves a work of art when photographed. Details almost always get pinned to my inspiration board in the studio.  Scraps of fabric, trims, and broken jewelry.  Snippets of ephemera, tags and event badges.  Photographs of vintage things, and magazine cutouts line my inspiration boards.  I layer them with the things that inspire me.  I think inspiration boards and detail photos are always a must.

The Selfie! I've been doing the selfie for decades.
Here's a selfie I recently took at my best friends
bridesmaid dress gala. This headband is so me.

Some of my recommendations:

  • -Chalkboard or rustic black backgrounds for leather, distressed, metal, and industrial vintage pieces. Try chalkboards, chalkboard paper or spray paint foam board with chalkboard paint. (I will post my homemade chalkboard paint recipe next week). 
    A chalkboard rustic background to showcase my authentic
    baseball necklaces
  • -Try paper bags, parchment paper, old sheet music, wicker baskets, maps, metal signs, books, globes and wood for additional rustic backgrounds. 
    Earrings I made for a friend, layered onto a
    piece of scrapbook paper from My Minds Eye.
  • -Kitschy wrapping paper, wall paper, scrapbook paper, or fabric for sweet, sugary products, baked goods and dolls.
  • -Furniture, trunks, dress forms and candle bases work wonders for height and dimension.
  • -Take photos from the bottom up, angled or upside down for some creative fun. 
  • -Look for eye catching reflections in glass windows or elements.
  • Don't forget the selfie, sometimes its all about the selfie.
  • -Outside props work fabulous. Think rustic barns, house siding, trees, benches, pools, lakes.
  • -The beach. Gotta love the photographic properties that the beach has to offer. Sun, sand, shells and  water. 
  • Inspiration boards! Make an inspiration board of the things that inspire you and inspire your brand. Add to it or take away from it the further along you go on your journey. 
  • Never steal someone's background or imagery for your own work.  Remember copyright is essential. Always respect other designers works. 
    Layering a piece onto a photo greeting card.  I used a greeting
    card and necklace I received for Valentine's day, photographed
    them together. Worked like a charm. Card from Taylor Swift,
    Necklace-Francesca's Boutique.
Next week I will post some creative backgrounds and paint recipes for you to use and create.

xo
Lisa
Thursday, March 26, 2015

A Day at Simplicity


With building the new blog format (not yet released), the website and creative work, I have neglected blogging for over a month, after returning from VK Live. During this time so much has happened and lots to share.  I'll start with a recap of my day in NYC at Simplicity and the girls.
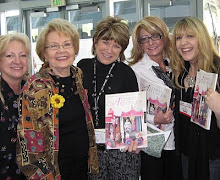
After getting our schedules together, I ventured into the city to see my friend Michele at Simplicity Creative Group, along with a friendly lunch with Michele Muska, Laura Kelly and Laura Neiman at Pera. You couldn't ask for a better group of girls to spend the day with. Being creative, fun and exciting.
 
Traveling to the city is just a train ride away for me and one I enjoy.  I always grab my coffee and start walking to my destination, first off Simplicity Creative Group.  Okay, I have to say, I just love it here.  I'm always excited here.  The ribbon room is like eye candy for the soul. I mean how do you choose your favorite ribbon, or trims, you just can't.
 

Exploring through the sewing department and seeing everyone hard at work to bring you the latest simplicity patterns and products is exciting.  Vintage dress forms still in use, fabrics draping down off tables, glimpses inside Ek Success Brands and chatting with creative types adds to your time there.  I love the staff and their creativity.

Before we left, the four of us exchanged gifties, hugs and love, then we were all off to enjoy a wonderful lunch at Pera.  Can you say fabulous? The food at Pera is divine, Mediterranean cuisine at its finest.


Relaxing with Michele and the girls was incredible, a complete pick me up for the month.  We all left happy, inspired and shall I say, full? lol.  I returned home with a bag of goodies and a fabulous memory with good friends.  Can't wait to see my girls again.

This bowl was a gift for my new dog "BO" from Laura Kelly, created in her signature style, along with personal heart ornaments for my momma and me, plus a stash of her buttons. The trims below are from Simplicity. These will grace some projects soon.

I will keep blogging here for all adventures and creative fun. The new blog on word press will have mostly projects and creative ideas.  It should be ready first week of April, I will keep you all posted.
Till then happy crafting!

xoxo
Lisa