Monday, January 27, 2014

DIY Coffee Filter Valentine


Create coffee filter valentines from hand dyed coffee filters and crepe paper . Created using Rit Dye, then embellished with Kewpie ephemera from Lisa Kettell Designs Cupieology, Scrapbook paper from Crate Paper, tinsel glitter, wire and bakery twine. This piece was inspired by vintage valentines and carnival colors. My fave project to share with you! 

Directions:
The material list and step by step directions for this project can be found in my Rit Studio at: 


Here is a glimpse at the finished coffee filter Valentines (Kewpie Valentine). Some where basic circus themed and others a mermaid themed.


I hope you have been inspired to create some fun valentine's of your own. Remember visit the Rit Dye Link at http://www.ritstudio.com/2014/01/24/diy-coffee-filter-valentines to view my coffee filter dye technique and the coffee filter valentine project instructions.

Magic and Joy,
xoxo
Lisa :-)))

Wednesday, January 22, 2014

Design Team Project by Tanya Watts


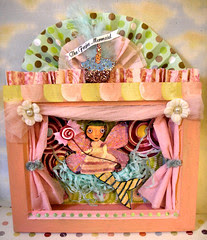
Materials/Instructions:

Gather everything you can get your hands on! RAID your sewing box, button jar, garden shed, toy box, packaging, lace, old material, twine, Lisa Kettell doll parts!! Tim Holtz metal pieces,...

Canvas, gesso, acrylic paint, string glue, I used Ranger's Glossy Accents, spray bottle with water, perfect pearls, mini misters, distress re- inkers (there are a lot of pearlescent mists out there but I still love to make my own), cheap paintbrush with long soft bristles ( to get into the most impossible places), gilding wax, Tim Holtz distress paint, I used the metallic ones, Distress glitter or glitter of your choice

Start by painting the canvas with gesso, let dry or if you are like me grab your heat gun!
Using gesso, collage papers, lace, material, ... down to make your background, just for a bit of textured interest.
Leave to dry or... Yes! Grab your heat gun! Just be careful not to bubble up the gesso unless you like that look, which I actually do.

Start adhering all your precious finds, make a design that pleases you but don't overthink it! Go with your feeling! Remember to incorporate you Lisa Kettell Design doll parts, they give it that special touch!
Leave to dry! This time keep your hands off that heat gun! I leave it for a few hours or overnight because that way I can't get impatient!


Okay, if you are anything like me, get up at 5:00am to continue! Seriously I did!

Now cover everything with gesso, get into all the little nooks and crannies to get every little piece of surface covered. Now you can reach for your trusty heat gun or leave to dry.
Assure it is really dry, unless you want gesso in your paint ( yes, I got gesso mixed in my black paint, but it actually looked good because it gave it depth)


Paint the whole canvas with acrylic paint of your choice and color, I used Adirondack paint dabber black, but by all means experiment with you favorite color.

You really need to be patient, get into every single spot, turn the canvas around to see it from a different angle, tilt it now and again to find all the white spots that you missed!
Heat gun! Or leave to dry.

Now come the metallic distress paints! Shake well, the mixing ball is in there for a reason! Unscrew the top( dabber and all) there should be paint in the part you screwed off, this is all you need, shake the top to splatter paint onto your canvas, use one or more colours.
Spray with water to let the paints react, move and tilt your canvas for drip page effect. Dry with heat gun. If you see pools of colour you don't like then just dab with paper towel.


Pearlescent spray: put one dropper of Distress Ink re-inker into a mini mister, add perfect pearls, as much or as little as you like, I just use the tip of my scissors as a scoop and I usually add 2 scoops. Fill with water, not all the way up, leave a little space, it will help with the mixing.
Shake it shake it shake it ( like a Polaroid picture!)


Mist onto your canvas as you please and again move and tilt for  drippage effect.
 You probably will grab for your heat gun right now... Your good!
Who has time to let things dry??

Rub some ( dry) perfect pearls onto the raised areas, I used a few different colours, be sparse, you really need a little! I use my finger tips and just use what is in the lid.
Buff up with a cloth or piece of kitchen paper. You can also ad some gilding wax here and there.

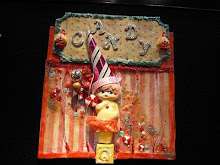
Add a small word that pleases you, cover with Glossy Accents.
I glittered part of the moon. Glittered the pearl I put in one of the shells
I added a metal phrase at the bottom.
Et voila!

Love & Peace

Tanya Watts
Wattstanya@ icloud.com
tanyawatts.blogspot.com
____________________________________________________________________________
Hope you enjoyed Tanya's project for the LK Design Team as much as I did. Visit her site for more amazing works.

Saturday, January 11, 2014

DT Creation By Caroline Sherman; The Circus Tree


"Here is my second creation for the design team at Lisa Kettell Designs. For this piece I was inspired by Lisa Kettell's love for the circus, carnivals and all things kitschy and fun! If you look closely you will see one of her handmade cupie doll heads used for the little girl taking a ride on the elephant. 

She is having a great time at the circus drinking soda pop, and eating a cupcake all while still being able to hold on to her glittery balloons. 

These carnival cupie heads, as well as more great faces/doll heads are so fun to work with and are available for purchase at Lisa's 


To make this piece I used:

  • Cupie Doll Head, Lisa Kettell Designs
  • Green Stars
  • Pearl Pins (2), Lisa Kettell Designs
  • Tinsel
  • Cupcake Holders
  • Vintage Cupcake Toppers
  • Beads
  • Glitter
  • Bulb Ornaments
  • Vintage Cracker Jack Prizes
  • Costume Jewelry
  • Vintage Yo Yo w/ Vintage Button (tree topper)


Thank you so much for your inspiration!

-Caroline
http://laughterandlemondrops.blogspot.com


How amazing was Caroline's design team project? I just loved it. Look for more projects made by Caroline coming soon. You can purchase charlotte head embellishments in various sizes and styles in my artfire store: 
http://www.artfire.com/ext/shop/studio/MoonfairesWorld

xo 
Lisa

Friday, January 10, 2014

Queen of the Soiree

One of my favorite things to do is to up-cycle discarded books and give them new life. For this piece I used a discarded used hardcover book and turned it into a vintage style handmade altered book. 

I ripped the original pages out of the book and replaced them with chipboard pages that were layered in vintage ephemera.

The pages where glued and stitched into the book using my double button technique. I coated the covers of the book with handmade paper rosettes and vintage bingo boards.

The front cover was further layered with a vintage party image from my collection which is available on the mixed collage image cd. I further embellished the covers with lettering, card stock shapes, buttons, gilding, ink and German glass glitters.

The inside pages where layered with more rosettes, ephemera, doilies, laces, and trims. German glass glitter and inks were also added to the pages for more dimension.


After every page was layered with ephemera, rosettes and embellishments I added various aged lace trims which I dyed with Liquid Rit Dye Cocoa color using a spray bottle and brush. Finally I added crepe paper fringes, sequin trim and broken jewelry pieces throughout.

I'll share more sneak peaks of the book and inside pages soon. I hope this project inspires you to create and recycle some discarded books in your collection, the possibilities are endless.

xoxo
Lisa

Saturday, January 04, 2014

Come and visit KALEIDOSCOPE Forest.....


Its the start of another week, looking outside at 8 inches of snow, the colors of Christmas are slowly fading as we enter a new year. This propelled me to take a visit to a land filled with color. A place where rainbows are permanent fixtures in the sky. The sound of calliope music and fairy flutes echo in the air. Arrivals of flying vessels sailing into port can be seen overhead and unicorns pull ornate carriages on land and always greet you with a smile.

You might be wondering what this enchanted place is called, not many know of its secret location. I was lucky enough to stumble upon the map to find this enchanted land which led me on an incredible journey where I made lots of friends along the way to this place they call Kaleidoscope Forest.

At the edge of Willow Cove there is a spectacular lighthouse standing several stories tall, illuminating glowing radiant beams of light across Willow Point, Willow Sound and Sierra Bay. On Saturday Morning at precisely 7am a rare beam of light eminates from the lighthouse onto a secret gate that glows a glisting gold. It stays this glistening gold color for 1 hour, then it begins to fade into blue, purple, then brown and poof its gone. This is the only time frame you have to arrive at the glistening gold gate in order to enter Kaleidoscope Forest from the Willow Point location.

Once the Keeper of the Gate and his gaurds approve your visit, you may enter through the gate and begin your journey to Kaleidoscope Forest. About a 1/2 mile down the main path, unicorn rides and floating boats are waiting to taxi you around the forest and its surrounding villages. There is even a series of tours you can take, the best one is Jolly Clover Tours which starts at 11am til 5pm. I picked this tour after reading the reviews in the Scopey Times paper and Scopey Guide book. Scopey is the nickname given to Kaleidoscope Forest by the locales.

I just can't explain to you the breathtaking view all around Scopey. Tree's made of stained glass, giant rose gardens and large glowing lanterns. Unicorn lessons, Mer-tailing lessons at Skully's in Rainbow Bay. Capsule launches and flying vessel air ship dining and hovercraft book lounges complete with coffee, cocoa or tea elixirs.

Day One was overwhelming, so much to see, do and explore. But first I needed to check into my hotel, The Carnival Wiltmore Hotel which over looks the whole City of Scopey and Rainbow Bay. Conceirge checked me in and my brought my bags to my suite which had a hanging boat waterbed with adjustable controls. My tea table was in a corner nook to the left that edged part of the crystal like cliff over looking the enchanted Pickering Alley similar to an indoor shopping arcade.

I sat down at the table and looked over at Pickering Alley, reading my area newspaper and guides deciding what to do first. Finally deciding on exploring the Alley with lunch at Tinkerbink's Tea Room and a day of shopping.....

Come back for a visit to the blog to read the rest of my adventure my trip to Kaleidoscope Forest.

xoxo
Lisa

(Note: All photos colored in and digitally enhanced by me. Some of these images in their raw state are available on my collage cds?

Thursday, January 02, 2014

DIY Tinsel Trees

Here is a great project to create for any time of the year, holiday, or party. You can use wire party tinsel or wire paper party garland to create this. The possibilities are endless. Trees are always great ways to jazz up a space or use as a display.


Materials:    

  •     Craft wooden dowel
  •     Foil pan
  •     Tinsel wired party garland
  •     Chlorine bleach
  •     Glass bowl large
  •     Glue
  •     Glue gun
  •     Hair dryer
  •     Large metal spoon
  •     Old towel
  •     Paper towels
  •     Plastic table cover
  •     Rubber gloves
  •     Scissors
  •     Rit Dye Colors Used: Petal Pink

Directions:


Directions To Make The Trees:  

  1. Cut 9 pieces from the tinsel wired garland measuring these dimensions: 3 pieces at 6 1/2 inches, 3 pieces at 4 1/2 inches, 2 pieces at 3 inches and one at 6 inches.
  2. On a craft wooden dowel, measure 2 inches from one end, mark in place with a pencil or pen.


  3.  Now wrap one of the 6 1/2 inch cut tinsel wire garland pieces around the craft wooden dowel at the 2inch mark. Repeat for the next 2 pieces of 6 1/2 inch cut tinsel wire garland pieces. Secure in place with hot glue. ( See pictures for guide )
  4. Measure an inch from the wrapped garland and mark with pencil. Begin wrapping the next set of cut tinsel garland pieces that measured 4 1/2 inches in the same way you wrapped the other pieces. Secure in place with hot glue.
  5. For the last piece that measures 6 inches, wrap 2 times around the top, secure with hot glue and pull straight up to finish the tree.

Directions For The Dying Tree: 

  1. Prep your surface. Lay plastic table cover or large old towel on the surface you will working over. Put on your rubber or latex gloves.
  2. Mix 2 teaspoons petal pink Rit liquid dye with 1 Cup hot water in a large glass or metal bowl. For good hot water, heat some in the microwave for 2 minutes. Let sit for 1/2 hour.

 Tips/Tricks: 

-Use a hair dryer or heat gun to speed up the drying process 
-You can dye the cut pieces of wire tinsel garland first before you wrap them around the dowel.
-Try wire paper garland in place of wire tinsel garland. If using the paper garland, reduce the amount  of dye time. 
-Mix Rit dyes for more color choices. Pour dye solution into a spray bottle for more fun effects.

  For more project photos visit the Rit Dye Studio under my project studio at: http://www.ritstudio.com/2013/12/30/diy-tinsel-trees/